
Original text by Botond Hartmann
The article describes a vulnerability research project targeting the Xiaomi C400 smart security camera, focusing on achieving remote code execution and a “cloud jailbreak” that allows the device to operate without dependence on Xiaomi’s cloud services. Researchers first performed firmware extraction and reverse engineering by dumping the flash memory and analyzing the embedded Linux system and its main services. During the investigation, they identified the miio_client service, which communicates with the mobile application over a proprietary UDP-based protocol called miIO. This protocol is responsible for device setup and communication with the smartphone application.
Further analysis revealed several critical weaknesses in the protocol implementation. The first issue allowed authentication bypass during the setup handshake, enabling attackers to complete the pairing process without knowing the device’s setup code. Another vulnerability involved the use of a predictable pseudo-random number generator, making cryptographic values guessable after observing enough protocol exchanges. Combined with a memory corruption bug in packet processing, these issues allowed attackers on the same wireless network to achieve remote code executionon the camera. The researchers ultimately demonstrated a full exploit chain that installs shellcode and enables a “cloud jailbreak,” allowing the camera to function independently from Xiaomi’s infrastructure.
Last summer, I had an opportunity to join TASZK Security Labs for a summer internship. The target we selected for this 2 months project was to hack Xiaomi Security Cameras, specifically a Xiaomi C400 Smart Camera, a very popular device in our market that we also happened to already have at hand.
We defined two end goals:
- create an RCE exploit via any wireless/LAN interface
- use the exploit to create a full “cloud jailbreak”
The motivation for the latter was that we knew that these devices are heavily dependent for their operation on the Xiaomi Smartphone Application and Xiaomi Cloud Server. Accordingly, our goal was to achieve a setup in which the camera is fully functional without any reliance on a Xiaomi account.
Given the time limit, the project was of course more real-life-CTF than an attempt at a comprehensive security review.
In the end, I identified 3 serious vulnerabilities in the implementation of Xiaomi’s proprietary device setup protocol, and was able to use them to build both the RCE exploit as well as the jailbreak that we set out to do.
The vulnerabilities we are releasing today were each reported to Xiaomi in September 2025. The companion advisories are published here, here, and here.
Interested parties may find more additional information about the disclosure process, and the patch status of the vulnerabilities, in the above linked advisories. We highlight here that the nature of these vulnerabilities require a physically adjacent attacker in practice, which limits their severity.
We are also releasing the full code for both the exploit and the jailbreak on our github: rce exploit, jailbreak.
(Note: the material released on github is provided as-is and for the sole purpose of advancing public research. We make zero claims, we do not offer and will not provide any support, use only at your own risk, any use for any illegal activity is expressely forbidden.)
In the following, I’ll describe the research journey and the technical bits of creating the exploit and jailbreak!
Reverse Engineering
Generally the first steps of reverse engineering such an IoT device are to obtain its software and to dissect them extracting executable binaries, config files, etc.
The firmware running on the devices may come from different sources, the most readily available is downloading the update files (OTA) from the manufacturer’s server. Also, the flash chip of the actual device can be directly dumped by wiring it up to a flash reader hardware. Depending on the hardening of the bootloader, the U-Boot may have been compiled with its interactive shell enabled, which makes it possible to dump the storage media much more easily.
With a dump of the system partition in hand, the static analysis part of the reverse engineering work can begin!
Most of the time static analysis is not enough, and it is desired to interact with the device as it runs on the real hardware. For purposes like rewriting configurations or managing running services, a shell access is crucial. The security cameras – being themselves embedded devices – usually have serial ports mainly to print application logs. However, some also present a login shell on them! Telnet and SSH access can also occur, probably gated behind a debug flag.
When the system-wide focus of reverse engineering narrows down to a single potentially vulnerable binary, more advanced debugging capabilities are needed. This can be a statically compiled gdb server deployed to the security camera, which can be accessed over network.
Xiaomi C400
For this research phase, shout-out to my colleague Lorant Szabo for his guidance and assistance.
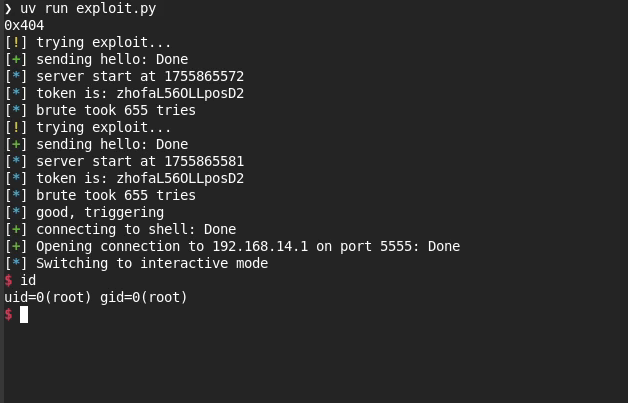
The very first challenge with this camera was to physical disassemble the device: the dome section has very stiff clips holding its two parts togother.
On the PCB, around the SigmaStar ARMv7 SoC, there were some visible test pads. By measuring them with a multimeter during the boot-up of the camera, one of them seemed like 3.3V signal. Hooking that pin into a logical analyzer we were able to identify that it is indeed an UART-TX pin, with 115200 baudrate. Then with trial-and-error the UART-RX pin is also found on the same set of pins. The UART pins are connected to an FTDI USB-serial adapter, and even though a huge amount of log message is received, the device seems to ignore anything coming from RX, so no login shell was given this way.
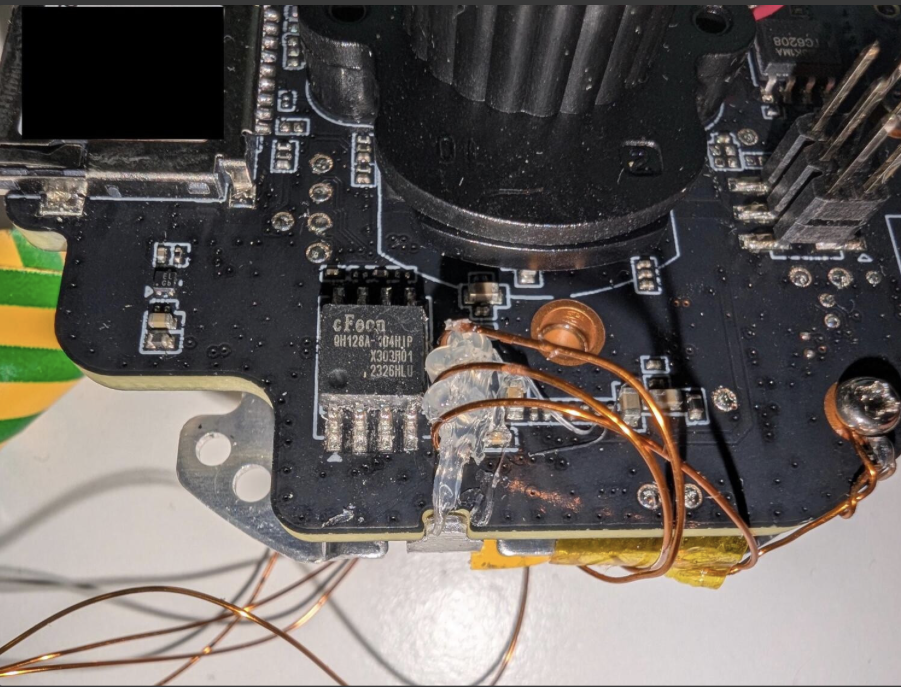
To obtain the actual software running on the device, we dumped the flash with the help of a SOIC-8 clip connected to a flash adapter and the flashrom tool on the PC.
This allowed us to find the cmdline of the Linux kernel inside the u-boot envvar partition. And by simply hooking the Linux init phase – by replacing the init=/linuxrc to init=/bin/sh, correcting the CRC of the UBOOT-ENV partition, and writing it to the flash externally – we finally got a shell on the serial port.
OTA Firmare
For Xiaomi devices, obtaining OTAs are tricky, as there is no support page with downloadable firmware files or public file listings for the firmware files. Xiaomi devices query the update from the Xiaomi update server, and they get served with the next possible OTA update URL.
However, there are some patterns in the URL, which contains the firmware version. So, albeit there is no comprehensive changelog of the device, this still may allow one to brute-force it.
In our case, as described above, we already achieved a root shell at this point, so we weren’t restricted to OTA firmware images for our reverse engineering needs.
System Partition
Further analyzing the system partition reveals multiple squashfs and JFFS2 partitions, containing the interesting service binaries on the USRFS partition.
After getting a shell, we find ourselves in a standard, Buildroot-based embedded Linux system with a busybox+uClibc userland. Inspecting the running processes, we see:
hostapd, creating an open Wi-Fi network that we can connect toimi_mike,miio_client,mi_daemon: these three processes contain the actual logic of the cameraimi_mikeis responsible for interfacing with hardware.miio_clientis the one that has an open UDP port. Apart from the DHCP server, this is the only network-accessible port that the device exposes.mi_daemonloads configuration and supervises the previous two processes, restarting them should they crash.- These three communicate by sending JSON over unix sockets and TCP loopback connections.
As the only one directly exposed to the network, miio_client is the obvious attack surface. When you purchase this device, you’re supposed to use a smartphone application to set it up – this is the program that the app is communicating with.
The static analysis of the executables is straightforward, as they are usual Linux ARM userspace binaries, and dynamic debugging on-target was more of the same.
Camera-App Communication Reverse Engineering
miIO Protocol
Xiaomi uses their own messaging protocol over UDP port 54321, dubbed miIO. The user first sends the following hello packet:

To which a device in “factory mode” (one that has not been set up yet) replies:
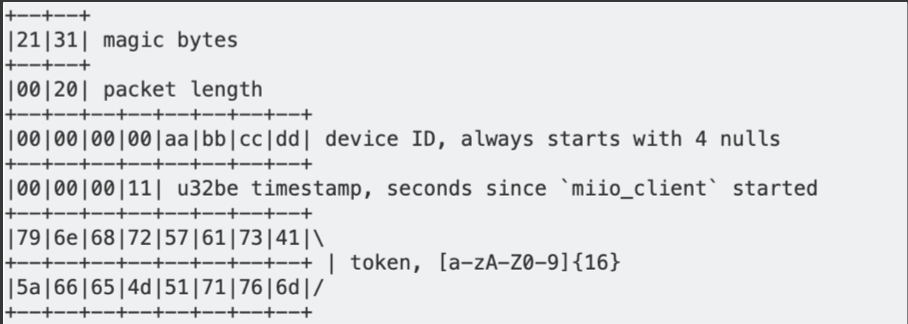
Now that the phone knows the device ID, server timestamp, and token, it can send packets that look like the following:
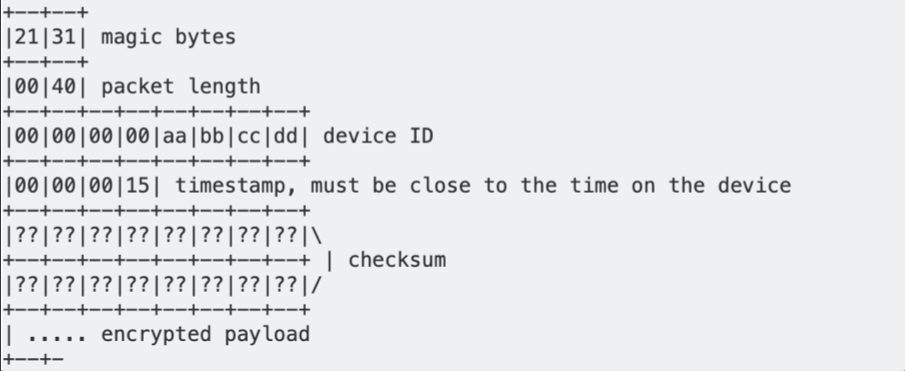
The payload is padded to a multiple of 16 bytes using PKCS#7 padding, then encrypted with AES-128 CBC mode, with key = MD5(token) and iv = MD5(key+token). The plaintext is normally JSON. This encryption ensures confidentiality of the payload.
The checksum is calculated by first filling its bytes with the token, then using MD5 on the whole packet. This means that the checksum acts as a MAC, since calculating it requires knowledge of the token. Together with the timestamp used to hinder replay attacks, this checksum is the authentication mechanism of the protocol.
Setup Process
When the camera is first taken out of the box, it is in a special “factory” state. This state can also be reached at any time by holding the button on the back of the camera for 10 seconds, performing a factory reset.
In the factory state, the camera hosts its own Wi-Fi Access Point with no authentication. A mobile phone can connect to this Access Point, and use the Xiaomi Home application to set the device up.
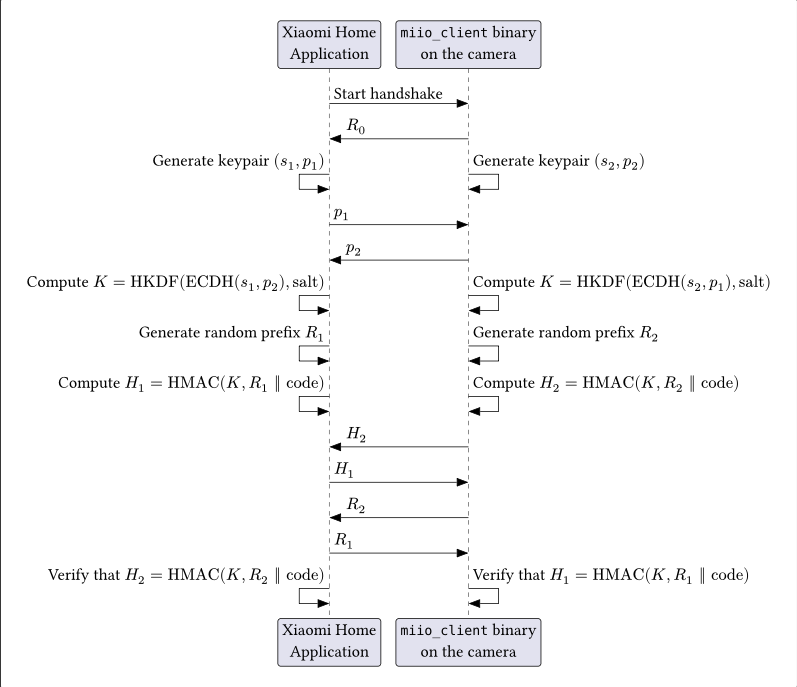
The setup requires the phone to send a specific sequence of “handshake” packets to the camera using the miIO protocol. The camera’s response to the handshake message (R0) contains a hex-encoded token. This token becomes the salt use in the later key generation step (K = HKDF(ECDH(s2, p1), salt)), as it was shown in the previous section describing the packet formats.
Once the sequence is completed successfully, including the finaly HMAC verification step, all further messages will include a MAC (instead of ffs or the token) and also encrypt the actual payload, as again it was showed above.
Completing the sequence by default requires a random, device-specific setup code that the user will get by using the Xiaomi Home application to scan the QR code on the bottom of the device, thereby requiring physical access. The alternative option is allowing the device to randomly generate a one-time code, which it communicates (literally via the speaker), as visible in this walkthrough.
The handshake sequence not only authenticates the phone’s physical access to the camera, but also allows the phone to verify that the camera has knowledge of the setup code as well, without either party disclosing the code itself. This prevents an attacker from impersonating a camera and fooling the application or leaking the code. An Elliptic Curve Diffie-Hellman key exchange also makes mounting a Man-in-the-Middle attack useless.
Takeaways: attack surface
As we can see from the above description, the miIO protocol design seems sound from a cryptographic perspective, Man-in-the-Middle scenarios are considered for the setup sequence and all further post-setup messages are protected by the shared key, using the MAC over the packet fields in a way that prevents hash-extension attacks. This comes before any other additional authentication may further narrow the attack surface.
However, as it turned out, the designers not only made mistakes in the cryptography implementation that made the setup sequence itself bypassable, but even left a memory corruption vulnerability in the (initial) packet processing code that allows an attacker to achieve full remote code execution via the WiFi interface.
Vulnerabilities
Vulnerability #1: Xiaomi – miIO Protocol Authentication Bypass
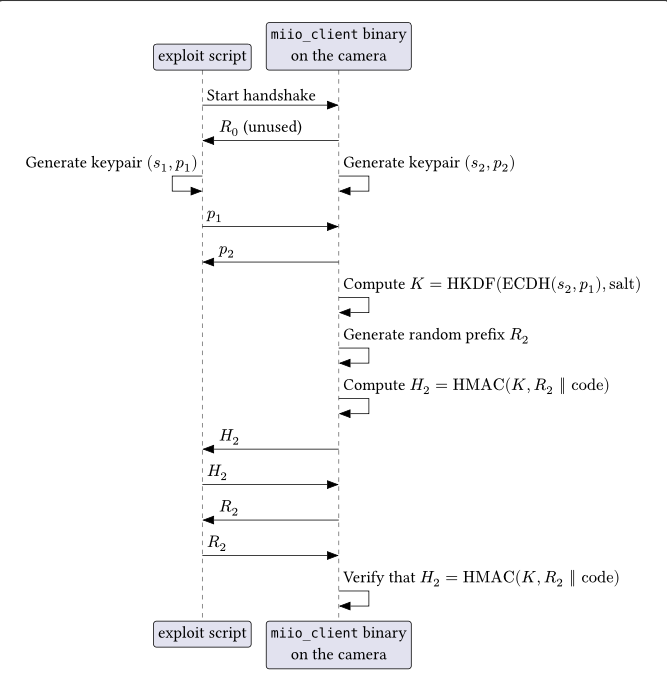
Due to a flaw in the design of the handshake sequence, it is possible to complete the setup flow without knowledge of the setup code by replaying certain values that the camera sends. This eliminates the necessity of physical access for the attacker.
Vulnerability #2: Xiaomi – miIO client cryptographically weak PRNG
For the keypair and random prefix generation in the handshake sequence, the camera uses the default Additive Lagged Fibonacci Generator of the uClibc library, which is unsuitable for cryptographic purposes.
After sending 22 packets on average, all future random numbers can be reliably predicted, which invalidates the requirements of the cryptographic primitives used in the setup flow.
In order to “generate” enough reflected randomness for this purpose, we can simply restart the handshake sequence and the camera will keep sending new R0 responses to the initial hello, with new random generated tokens.
Our PoC demonstrating this exploit in practice can be found here.
Going back to the protocol design, it is worth asking the question why this matters. Generally speaking it’s never a good sign if the PRNG can be trivially broken, but we still want to see what the concrete implications may be.
First, given the length of the QR code based code (128 bits), there’s not a lot of value in breaking the PRNG in order to try to bruteforce that. Besides, even if we wait until the sequence, we would always get R2 after we get H2, so we wouldn’t need to predict anything in order to have every input “apart from” the code if we wanted to attempt this bruteforce (which, again, would be a futile exercise given our current knowledge of computational resource realities, anyway).
On the other hand, in the scenario where the random-generated code would be used, that code is only 4 digits, so the entropy of that is trivially breakable even without having to bruteforce offline. Naturally, given that the implementation by design allows somebody with physical access to the camera to force a reset and force the camera to literally say the code out loud, it also feels like the RNG design shortcoming is not a critical one.
However, there is a third scenario which actually makes the RNG problem meaningful. As we can see from the sequence, once an attacker was able to break the RNG, nothing will stop it from precisely computing further generated K values (given that all of s2, p2, salt will become predictable) even when it is no longer the actual party impersonating the Xiaomi Home Application.
In other words, the attacker can execute the RNG break first, “go away” and allow the real owner to redo the proper setup on its own second, and then proceed to eavesdrop all comms on the miIO interface, which, among other things, will include the otherwise plaintext WiFi credentials pushed to the camera.
In essence, the RNG vulnerability directly breaks any 802.11 level security and gives a convenient direct access to the LAN – and of course to any potential next stage attacks.
Vulnerability #3: miIO client heap buffer overflow
To recap: the packets of Xiaomi’s miIO protocol contain a header, an MD5-based Message Authentication Code (MAC), and an AES-128-CBC encrypted payload. The payload is padded to a multiple of 16 bytes before encryption. The MAC is calculated after encryption.
After verifying the MAC, the miio_client binary decrypts the packets received on UDP port 54321. Instead of rejecting packets with a payload size not divisible by 16 bytes, the AES decryption function contains code specifically for this case, which is not normally reached, since normal packet payloads are correctly padded.
// AesCurrentBlock, AesKey and AesIv are global pointers
void AesCbcDecrypt(
    const byte *ciphertext, uint size,
    byte *plaintext, byte *key, byte *iv
) {
  byte *dst;
  const byte *src;

  uint remainder_bytes = size & 0xf;
  // copy16 copies 16 bytes from the second argument to the first
  copy16(plaintext, ciphertext);
  AesCurrentBlock = plaintext;
  if (key != 0x0) {
    AesKey = key;
    AesKeyExpansion();
  }
  if (iv != 0x0) {
    AesIv = iv;
  }
  uint offset = 0;
  while (true) {
    src = ciphertext + offset;
    dst = plaintext + offset;
    // Incorrect if remainder_bytes != 0, there might not be a full block left
    if (size <= offset) break;
    offset = offset + 0x10;
    copy16(dst, src);
    AesCurrentBlock = dst;
    AesBlockDecrypt();
    XorWithIv(dst);
    AesIv = src;
  }
  if (remainder_bytes != 0) { // Never happens on valid (padded) packets
    copy16(dst, src);
    memset(dst + remainder_bytes, 0, 0x10 - remainder_bytes);
    AesCurrentBlock = dst;
    AesBlockDecrypt();
  }
}
The size of the partial block is saved as remainder_bytes, but size is not decremented by this amount. This causes the last block (in the if condition) to read the ciphertext from outside the input buffer, and write the decrypted plaintext outside the output buffer residing on the heap.
Since the program uses the packet length specified in the miIO protocol header, the attacker can control the bytes after the input buffer by sending a UDP packet larger than this length, thereby controlling the 16 bytes that are written past the bounds of the plaintext heap chunk.
Exploitation
We can achieve remote code execution by exploiting Vulnerability #1 and #3 combined together.
Controlled overflow
We can use the fact that the protocol has a packet length field, instead of using the size of the UDP packet that the device received. If we send a packet that is larger than what the length field indicates, then we also control the bytes that are after the input buffer.
Furthermore, if we make sure that the length of the packet is only one less than a multiple of 16, then the AesCbcDecrypt function only sets the last byte of the overflow block to 0, meaning that we control 15 of the 16 bytes that are the input to the AES decryption.
Since the output buffer is on the heap, we can use this overflow to corrupt the next chunk. The binary uses uClibc’s malloc-standard allocator, which stores chunks like the following:
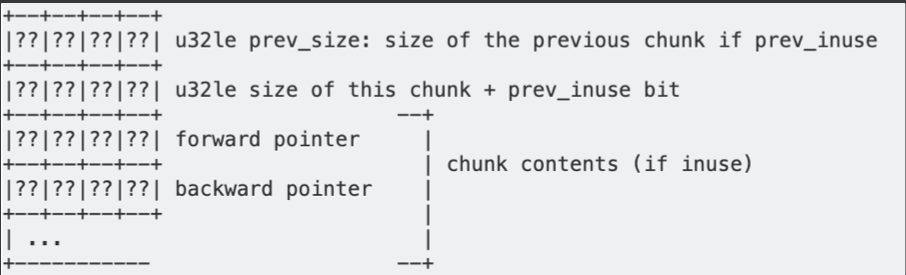
Since we have an overflow of 16 bytes, we can completely overwrite the metadata of the next chunk. The fact that we don’t control the input to the decryption completely can also be worked around:
Since the prev_size field is ignored while the previous chunk is in use (not freed), we can set the other 3 metadata fields however we like, and try many possible values for the prev_size field, until we find that the ciphertext naturally ends with a null byte. The prev_size field has 2^32 possible values, and we should expect one in 256 ciphertexts to end in a null byte, so this should not be an issue.
The allocator has two types of “bins” in which it stores chunks that have been freed: doubly-linked lists (unsorted bin, smallbins, largebins) using both forward and backward pointers, and singly-linked lists (fastbins), using only the forward pointers.
Corrupting a doubly-linked list and adding a chunk at an arbitrary address will certainly abort the program because of the following check:
/* Take a chunk off a bin list */
#define unlink(P, BK, FD) {       \
  FD = P->fd;                     \
  BK = P->bk;                     \
  if (FD->bk != P || BK->fd != P) \
      abort();                    \
  FD->bk = BK;                    \
  BK->fd = FD;                    \
}
Therefore, it is more useful to corrupt a chunk that is in a fastbin, letting us overwrite the forward pointer of the linked list. This means that we can add a “fake” chunk to the fastbin list: a memory area that the allocator believes is free and can give out to an allocation request, even though it was never a proper heap chunk that has been allocated and freed.
Getting a chunk that is in the fastbin directly after the chunk we can overflow can be achieved by following (but not completing) the normal setup flow of the device, which includes generating elliptic curve keypairs using the statically-linked mbedtls library. This operation leaves quite a few chunks on the fastbins. To see how this can be accomplished, see the next section.
We can purposefully insert an invalid signature in the final packet of the setup flow, keeping the device in its initial state, but leaving many chunks on the heap, ready for sending a packet that triggers the heap overflow.
Finding a working fake-chunk
There is a complication, however: after decrypting our packet, the binary begins to parse the JSON contained within, leading to a large allocation:
int jsmi_parse_start(/* ... */) {
  jsmntok *tok_array = malloc(0x650);
  // ...
}
Such a large allocation makes malloc() call the libc-internal __malloc_consolidate() function, which places all of the chunks currently in the fastbins into the unsorted bin, consolidating them with the previous/following chunks if possible.
This means that our fake chunk needs to fulfill three things to be useful:
- It must have a size that is sane, meaning that it could be allocated later. If the size is too small (e.g. 0-8 bytes), we will never be able to allocate it. If the size is too large, it will likely be used by other parts of the program (including other threads), filling it before we can.
- The forward pointer of the fake chunk must be 0, otherwise the allocator will follow the pointer looking for the next chunk, which will likely crash since it does not meet these criteria.
- The allocator must think that the previous and the next chunks are currently in use. Otherwise, it will try to unlink() them, which will either crash or abort, since the forward and backward pointers will not be correct.
While the Linux kernel has ASLR enabled, the miio_client binary itself is not compiled as position-independent code. Therefore, if we find a suitable pointer belonging to the binary (as opposed to any loaded shared libraries), we can be sure that it will be the same on every execution.
Searching for addresses in memory which meet the previous criteria, we can discover the following bytes:
0x000a347c│+0x0000: 0x00000000 <- fake chunk prev_size
0x000a3480│+0x0004: 0x0000006f <- fake chunk size + prev_inuse flag set
0x000a3484│+0x0008: 0x00000000 <- fake chunk forward pointer
0x000a3488│+0x000c: 0x00000000
0x000a348c│+0x0010: 0x00000000
0x000a3490│+0x0014: 0x00000000
0x000a3494│+0x0018: 0x000156ed -> miio_online_hook_default()
0x000a3498│+0x001c: 0x000158cd -> miio_offline_hook_default()
0x000a349c│+0x0020: 0x00000000
0x000a34a0│+0x0024: 0x00015869 -> miio_info_kvs_hook_default()
0x000a34a4│+0x0028: 0x00015485 -> miio_ext_rpc_hook_default()
0x000a34a8│+0x002c: 0x00015805 -> miio_restore_hook_default()
0x000a34ac│+0x0030: 0x000157a1 -> miio_reboot_hook_default()
0x000a34b0│+0x0034: 0x00000000
0x000a34b4│+0x0038: 0x00000000
0x000a34b8│+0x003c: 0x00000000
0x000a34bc│+0x0040: 0x00000000
0x000a34c0│+0x0044: 0x000806dc
0x000a34c4│+0x0048: 0x00000003
0x000a34c8│+0x004c: 0xffffffff
0x000a34cc│+0x0050: 0xffffffff
0x000a34d0│+0x0054: 0xffffffff
0x000a34d4│+0x0058: 0xffffffff
0x000a34d8│+0x005c: 0xffffffff
0x000a34dc│+0x0060: 0xffffffff
0x000a34e0│+0x0064: 0xffffffff
0x000a34e4│+0x0068: 0xffffffff
0x000a34e8│+0x006c: 0xffffffff
0x000a34ec│+0x0070: 0xffffffff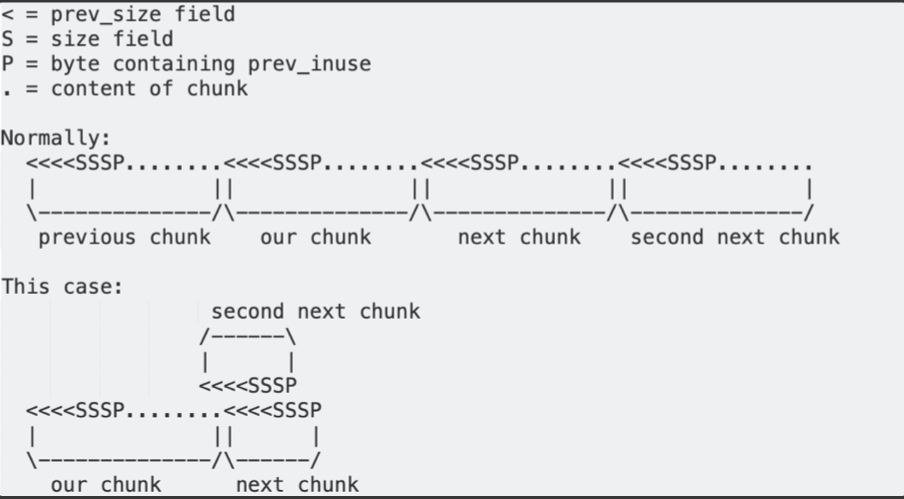
0x000a34f0│+0x0074: 0xffffffff- Since 0x6f has its least-significant bit set, the allocator will think the previous chunk is in use.
- The next chunk should start at 0x000a347c + 0x6e = 0x000a34ea, with its size field at 0x000a34ee. This value is 0xffffffff, so the size is 0xfffffffe (signed -2). The second next chunk should start at 0x000a34e8, with its size field at 0x000a34ec. The value is 0xffffffff with the least-significant bit set, so the next chunk is also in use.
Triggering the function-pointer overwrite
Now, we can send an appropriately-sized packet, so that the decrypted payload ends up in this fake chunk, overwriting it. Specifically, we want to overwrite two values (we can overwrite the others with their original values, so that we only minimally disturb the program):
- The function pointer at 0x000a34a0, normally pointing to the
miio_info_kvs_hook_default()function - The value at 0x000a34bc
Afterwards, if we send a packet with the following payload:
{"id":1,"method":"miIO.info"}
we can observe our overwritten function pointer at 0x000a34a0 being called, with the value we set at 0x000a34bc as the value of the register r3.
Expanding the weird machine
To use our function pointer overwrite for arbitrary code execution, we will need to find gadgets of the following form:
ldr rA, [r3, #??]; ldr rB, [r3, #??]; bx rB
That is, we want to load the value of a register from r3 (that we control), and we want to load another value from r3 that we jump to. Chaining such gadgets allows us to set multiple registers while keeping hold of the control flow.
Some useful gadgets of this form are:
0x00041be0 : ldr r0, [r3, #4] ; ldr r2, [r3] ; blx r2
0x000364a2 : ldr r2, [r3, #0x2c] ; ldr r1, [r3, #0x30] ; blx r2
Using these, we can control the registers r0 and r1. We just need to set r3 to an address that points to data we control. Thankfully, it is easy to attach some extra data to our triggering packet using a null byte:
{"id":1,"method":"miIO.info"}\x00 anything goes here
The malloc implementation in uClibc uses brk(), placing the heap after the binary in memory. This means the heap begins at a known address, since our binary is loaded at a fixed address.
Also, if the packet is big enough (larger than 1KB), the allocator will predictably put it at the end of the heap, since it will not fit into any holes between other chunks. Since the program always performs the same allocations at startup, assuming no other large allocation is currently live, we know the address where our packet will end up.
This is quite a reasonable assumption, since the program is single-threaded and does not leak memory during normal operation, which means that even if it had received a large packet before, that packet would have been freed by the time our packet was being processed, leaving our packet at the end of the heap nonetheless.
Since we can reliably predict where our packet will be written to, we can set r3 to point to it.
Even better, in case our assumption was somehow incorrect, our exploit (using an incorrect address) will cause the process to crash, prompting the mi_daemon process to restart it straight away. This leaves us with a fresh heap, where only the deterministic startup allocations have happened, allowing us to successfully run our exploit a second time.
Now, having control of r0 and r1, we can jump to the following gadgets:
0x00071dd8 : mov r7, r0 ; add r0, sp, #0x14 ; str r0, [sp] ; ldr r4, [r1, #8] ; ldr r0, [r1] ; ldr r5, [sp, #0x50] ; blx r4
0x0004f87c : mov sp, r7 ; pop.w {r4, r5, r6, r7, r8, sb, sl, fp, pc}
The first allows us to move the value in r0 to r7, and allow us to maintain control through loads from r1. (It also does some operations that are not useful to us, but they don’t crash either.)
The second moves the value from r7 to the stack pointer, allowing us to pivot the stack wherever we want. Naturally, we will choose the extra data section of our packet again, allowing us to control the entire content of the new stack, transitioning us into a ROP attack.
On ARM, the return address of a function is stored in the lr register instead of the stack, so we will have to overwrite it to maintain control after a call. Two gadgets are useful here:
0x0004bb18 : pop {r0, r1, r2, r3, r5, pc};
0x00071052 : pop.w {r4, lr} ; bx r3
Using these, we control r0, r1, r2 and lr, meaning that we can call any function of at most three arguments.
Planting the shellcode
Next, we can try calling functions in the binary. While we don’t know the address of libc.so because of ASLR, we can use the PLT of the binary to call standard library functions that are linked to it.
One such function is system(), which we can use to execute arbitrary commands on the device. However, there is no convenient way to start a reverse/bind shell this way, forcing us to execute the exploit again for all commands that we would like to run. We also have no easy way of getting the output of the command.
Alternatively, we can use the following chain of calls:
fd = open("/proc/self/mem", O_RDWR);
lseek(fd, 0x13000, SEEK_SET);
write(fd, shellcode_ptr, shellcode_length);
Where 0x13000 could be any arbitrary address that is executable. Instead of finding gadgets to preserve the file descriptor returned by open(), we can call open() many times, making it easy to guess a file descriptor number that corresponds to /proc/self/mem. Note that the write() call works because on the default configuration of the Linux kernel, /proc/self/mem ignores write protections, allowing us to change the executable segment.
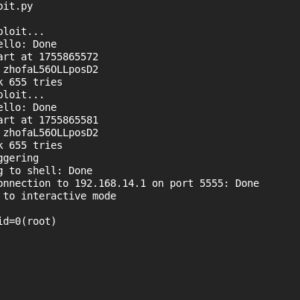
After writing the shellcode for a bind shell to 0x13000, our last step is to jump to it, finishing the exploit. Since the miio_client process runs as root without any sandboxing, we have control over the entire system.
Combining Vulnerabilities
Because the Access Point of the camera in factory state is not protected, when a user attempts to set a camera up, an attacker in Wi-Fi range of the camera can use Vulnerability #1 (or #2) to complete the setup remotely, without physical access or visibility, faster than the user.
This can lead to the attacker being able to look at the camera feed. However, this attack is likely to be noticed by the user, since they will be unable to execute the setup of an already in-use camera.
On the other hand, with Vulnerability #3, the attacker can also take over the device entirely and install a persistent backdoor. This could be done without the user noticing.
An attack on an already installed device is also possible, if the attacker has brief physical access. Pressing the button for 10 seconds to factory reset the camera, then using Vulnerability #1 and Vulnerability #3, the attacker can install a backdoor in the same way. Note that because of Vulnerability #1, the attacker does not need the QR code on the bottom of the camera, therefore the attacker does not need to move the camera. Covering or removing the QR code is insufficient defense.
Post-Exploitation: Cloud Jailbreak
The goal of a “cloud jailbreak” is to modify the camera runtime in such a way that no cloud connection is required to be configured at all.
We basically need two things: replace functionality that would be done via the cloud + make sure the cloud won’t interfere with the device.
Implementation
This is achieved in 4 steps:
- gain root access on the device
- gain persistence (across reboots)
miIOreplacement: implement a new way of talking to the device- cut out cloud interference via firewalling
The exploit described above provides step 1.
For Step 2, an OS script/binary must be found that gets executed and can be changed without flashing the full device. The /mnt/data/sysctl is one such script.
To run custom code, LD_PRELOADing our library works (even on noexec partitions), which can hijack a vendor-provided binary. For this, the imi_mike binary is targeted, which starts up the implant instead.
For Step 3, the jailbreak implent (a ~600 line “executable”) itself calls into the lib functions also used by Xiaomi to move the camera and access the camera feed. This code implements sending the feed through TLS to a server (using MPEG TS format), and the ability to save the content to the SD card with asymmetric encryption. It also accepts commands to move the motor.
On the server-side, one can run a simple ffplay command line based solution, or even use a more user-friendly setup which uses a web GUI for IP cameras called frigate NVR.
Finally, for Step 4, because we intend to implement a minimal set of changes, the camera software stack is not directly patched further to prevent access to the cloud. Instead, since at this point the cloud is no longer necessary for functionality, the preferred setup can simply rely on customized firewall rules that make sure that no unintended Internet access is allowed to the device.
Installation & Usage
We detailed all the necessary steps to recreate this in the repository that we released on our github here.