
Executive Summary
This walkthrough takes a deliberately simple Windows x64 crackme — crackMe_xor.exe — and breaks it open in x64dbg. The binary takes a 10-character serial key on the command line, XORs each byte against a fixed 10-byte key, and compares the result to a hard-coded integer array. There’s no anti-debugging, no packing, no string obfuscation beyond the XOR itself; the value of the exercise is that it teaches the reflex every reverse engineer needs first: spot the loop, spot the key, spot the comparison, and reverse the algebra.
The result is a clean recipe for any single-key XOR crackme. Identify the XOR loop by looking for an obvious cmp / jg 10 bound and a xor reg, reg instruction inside the loop body, dump the key bytes off the stack as they’re loaded from immediates, dump the comparison array out of the CheckPass function, and XOR the two together. In this case the key is the ASCII string UVWXYZQRST and the comparison array, once decoded back through the key, spells out strongpass. The same technique generalises to malware obfuscation, packed strings, and the long tail of practical XOR-based hiding that real samples use every day.
Prologue: What We’re Reversing
The previous post in this series covered the easy case — a binary that held its check password as a plaintext string and gave itself away on a strcmp. Real binaries don’t do that. Even very lazy obfuscation will pass the password through an XOR with a fixed key so that strings(1) shows nothing useful. XOR ciphers are the simplest possible transform in this space — the same key both encrypts and decrypts — but they are surprisingly common in commodity malware and packers.
The crackme is small and the C source is published in full on the author’s GitHub. The two pieces of state worth marking before we start are the key — an integer array of ten ASCII codes {85, 86, 87, 88, 89, 90, 81, 82, 83, 84}, which spells UVWXYZQRST — and the comparison array PArray = {38, 34, 37, 55, 55, 61, 33, 51, 32, 39}, which is what the XOR’d user input is matched against. The check passes when the per-byte XOR of the input matches PArray element-for-element.
#include <stdio.h>
#include <string.h>

void CheckPass(int *XoredPassword) {
    int PArray[10] = {38, 34, 37, 55, 55, 61, 33, 51, 32, 39};
    bool is_equal = true;
    for (int i=0; i<10; i++) {
        if (XoredPassword[i] != PArray[i]) {
            is_equal = false;
            break;
        }
    }
    if (is_equal == true) {
        printf ("[+] Correct Password");
    }
    else {
        printf ("[-] Incorrect Password");
    }
}

int main(int argc, char *argv[]) {
    if (argc != 2) {
        printf("Help:\n%s <10 character serial key>\n", argv[0]);
    }
    else {
        int stringLength = strlen(argv[1]);
        if ((stringLength > 10) || (stringLength < 10)) {
            printf("[-] Serial key must be of 10 characters. Please recheck your key\n");
        }
        else {
            int XoredDecimal[10] = {};
            int keyStore[10] = {85, 86, 87, 88, 89, 90, 81, 82, 83, 84};

            for (int i=0; i<10; i++) {
                XoredDecimal[i] = ((int)(argv[1][i]))^(keyStore[i]);
            }
            CheckPass(XoredDecimal);
        }
    }
    return 0;
}
Loading the Binary in x64dbg
Start x64dbg with the crackme as its argument and a placeholder password — anything ten characters long. PowerShell makes this easy: pass the absolute path of the executable as the first argument and the dummy key as the second:
PS C:\Users\Paranoid Ninja\Desktop> & '.\x64dbg - Shortcut.lnk' 'C:\Users\Paranoid Ninja\Desktop\crackMe_xor.exe' password12x64dbg drops into the loader; the first instructions you see belong to ntdll.dll, not to the crackme itself. Windows resolves the PE’s import table first, walking ntdll.dll, kernel32.dll, KernelBase.dll, and msvcrt.dll, before transferring control to the binary’s entry point. Don’t single-step through that — use F9 (Run) to land in the user-mode entry, or step until you reach the application code.
The shortest path to the relevant routine is the String References view (right-click in the disassembly, “Search for → All modules → String references”). The crackme’s output strings (Help:, [-] Serial key must be of 10 characters, etc.) lead straight to the comparisons that gate them:
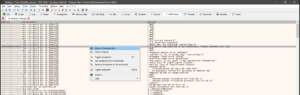
Disassembly: Following the Bytes
After the argument-count checks (argc != 2) and the length check (strlen != 10), control reaches the interesting block at 0x0000000000401681. Set a breakpoint there with F2 and continue:
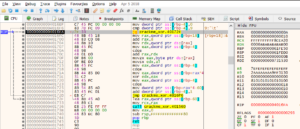
0x401681 — the start of the XOR-loop setup. Source: original article.The Key Lands on the Stack
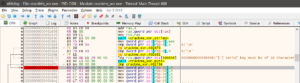
From 0x4016A9 to 0x4016EF the compiler emits a sequence of MOV [RBP-offset], imm32 instructions that lay the ten key bytes onto the local stack slot for keyStore[]. Each immediate is a single ASCII code — the high three bytes are zero because the array is int[10], not char[10]:
MOV [RBP-X], imm32 instructions that populate keyStore[] on the stack. Source: original article.Reading the immediates left-to-right gives the key directly: 0x55, 0x56, 0x57, 0x58, 0x59, 0x5A, 0x51, 0x52, 0x53, 0x54 — the ASCII codes for U, V, W, X, Y, Z, Q, R, S, T. Tabulated:
| Slot | 0 | 1 | 2 | 3 | 4 | 5 | 6 | 7 | 8 | 9 |
|---|---|---|---|---|---|---|---|---|---|---|
| Character | U | V | W | X | Y | Z | Q | R | S | T |
| Hex | 0x55 | 0x56 | 0x57 | 0x58 | 0x59 | 0x5A | 0x51 | 0x52 | 0x53 | 0x54 |
| Decimal | 85 | 86 | 87 | 88 | 89 | 90 | 81 | 82 | 83 | 84 |
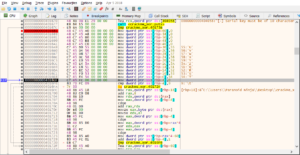
The Loop Counter and the jg 10 Bound
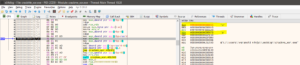
At 0x4016FA a comparison of the counter (in RBX) against 10 followed by a jg tells you with absolute confidence that this is a ten-iteration loop. That — together with the immediate 0x55 immediately preceding — is the signature of a fixed-key XOR over a fixed-length buffer:
cmp RBX, 10 / jg — the loop exits after ten iterations. Source: original article.The XOR Site
Inside the loop body, the password byte is loaded into RAX / EAX at 0x401704 and 0x40170F, the key byte is loaded into a second register, and the xor itself happens at 0x40171E:


0x40171E. Source: original article.Stepping a single iteration with F7 shows the register state at the moment of the XOR. RDX holds the current password byte (here the first character 'p' from password12, ASCII 0x70) alongside the matching key byte 'U' (0x55):
'p' (0x70) and key byte 'U' (0x55) in RDX. Source: original article.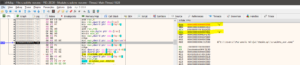
'a' and key byte 'V'. Source: original article.The arithmetic is worth doing by hand for the first byte so that the loop’s contract is crystal clear:


The Call into CheckPass
After all ten iterations of the XOR loop, the buffer XoredDecimal[] is handed to CheckPass via the call at 0x401736:
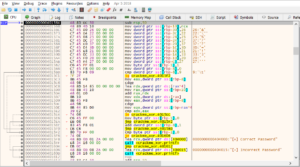
CheckPass at 0x401736. Source: original article.Inside the callee, the same MOV [RBP-X], imm32 pattern lays down the comparison array PArray[]. The immediates — in the order they’re emitted — spell out the “goal” XOR’d password. Their hex values are:

| Slot | 0 | 1 | 2 | 3 | 4 | 5 | 6 | 7 | 8 | 9 |
|---|---|---|---|---|---|---|---|---|---|---|
| Hex | 0x26 | 0x22 | 0x25 | 0x37 | 0x37 | 0x3D | 0x21 | 0x33 | 0x20 | 0x27 |
| Decimal | 38 | 34 | 37 | 55 | 55 | 61 | 33 | 51 | 32 | 39 |
PArray[] values inside CheckPass. Source: original article.The comparison itself is at 0x4015E2 — an element-wise cmp that branches to incorrect password on the first mismatch:
0x4015E2 inside CheckPass. Source: original article.Recovering the Password
XOR is self-inverting: (input ^ key) ^ key == input. We know the XOR’d output the program is matching against (PArray), and we know the key (UVWXYZQRST). The original password is therefore PArray ^ key, per byte:
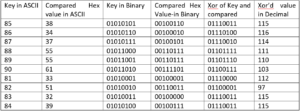
| Slot | PArray (hex) | Key (hex) | XOR (hex) | ASCII |
|---|---|---|---|---|
| 0 | 0x26 | 0x55 | 0x73 | s |
| 1 | 0x22 | 0x56 | 0x74 | t |
| 2 | 0x25 | 0x57 | 0x72 | r |
| 3 | 0x37 | 0x58 | 0x6F | o |
| 4 | 0x37 | 0x59 | 0x6E | n |
| 5 | 0x3D | 0x5A | 0x67 | g |
| 6 | 0x21 | 0x51 | 0x70 | p |
| 7 | 0x33 | 0x52 | 0x61 | a |
| 8 | 0x20 | 0x53 | 0x73 | s |
| 9 | 0x27 | 0x54 | 0x73 | s |
strongpass. Source: original article (verified independently).
Re-run the crackme with the recovered password and the success branch fires:
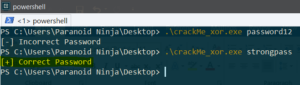
[+] Correct Password — the recovered password is accepted. Source: original article.Key Takeaways
- The signature of a fixed-key XOR loop on Windows x64 is a stretch of
MOV [RBP-X], imm32followed by acmp / jg Nloop with anxor reg, regin the body. Once you see it, the key is in the immediates. - The decompiled C is a one-page program, but the disassembly stretches over many addresses because each
intstore is a separate instruction. Don’t be intimidated by length — count the repetitions instead. - XOR is self-inverting. As soon as you have the key and the comparison target, you have the plaintext. There is no need to brute-force or to keep the debugger attached.
- String References in x64dbg is the fastest way into any crackme that prints anything — one click takes you to the conditional that gates the message.
- The same shape recurs at scale: malware loaders frequently XOR strings, URLs, and shellcode with one or a few short keys. The reflexes you build on a toy crackme are exactly the ones you’ll reuse.
- Always step the loop a single iteration, not a single instruction. You learn the contract faster from one full pass through the body than from twenty stops between micro-instructions.
- Watch out for the
int[]-vs-char[]distinction in the disassembly: each stored byte takes four bytes of stack because the source code declared anintarray. The padding is structural, not interesting.
Hardening Checklist
- Treat single-byte / single-key XOR as no protection at all. If your software relies on XOR-obfuscated strings or keys to keep something secret, it is one
x64dbgsession away from disclosure. Use a real KDF + AEAD if the value is worth hiding. - Don’t emit comparison constants as immediates near the user-input path. The
MOV [RBP-X], imm32sequence insideCheckPassis the single biggest tell in this binary. If you absolutely must embed a comparison array, build it at runtime from material that isn’t a constant. - Strip symbols and unused string output before shipping. The
[+] Correct Password/[-] Incorrect Passwordstrings are what gave the reverse engineer the breakpoint in the first place. Quiet successful paths leak less. - Add a check on debugger presence if the threat model requires it.
IsDebuggerPresent,CheckRemoteDebuggerPresent, and PEB-walk variants raise the bar against beginner-level RE. They don’t stop experienced reversers but they do filter casual attempts. - For real secrets, prefer DPAPI or a TPM-backed key. If the binary needs a secret that is unique to the user or the machine, ship none in the binary at all — bind it to the OS’s credential store.
- If you ship XOR-obfuscated content, change the key per build. A single fixed key turns every install into the same disclosure once one is broken; a build-time random key plus a build-time random encoding makes batch decoding harder.
- Hunt for XOR loops in defender telemetry. A short fixed-length loop with a
xorin the body and a small immediate count is one of the cleanest YARA / detection signatures for staged shellcode loaders; the same shape that defeats a beginner crackme also fingerprints commodity malware.
Conclusion
The point of this walkthrough is not the password — strongpass — but the reflex. The first time you reverse a binary, the disassembly looks like a wall of text. After one or two of these crackmes you start to read it the way you read prose: cmp / jg N means “loop bound”, a column of MOV [RBP-X], imm32 means “literal array on the stack”, an xor reg, reg in the loop body means “single-key XOR”, and a sequence of comparisons after the loop means “goal value”. Once you can see those shapes at a glance you have crossed the line between staring at disassembly and reading it. Credit and thanks to Chetan Nayak for the source code, the screenshots, and the original tutorial; the canonical write-up is on Network Intelligence’s blog with the source on GitHub.
References
- Original article — Chetan Nayak, Network Intelligence (July 29, 2025)
- Original 2018 post on scriptdotsh.com
- paranoidninja/ScriptDotSh-Reverse-Engineering — crackMe_xor source on GitHub
- Part 2 — Reverse engineering basics (prior tutorial in the series)
- XOR cipher — Wikipedia
- x64dbg — open-source x64/x32 Windows debugger
Original text: “Reverse Engineering For Beginners – XOR encryption – Windows x64” by Chetan Nayak at Network Intelligence (July 29, 2025).